Splitting Maul
Camp Tools – Level 3
The splitting maul. A maul is heaver and has a wider head than an ax which makes it advantageous to splitting wood. An ax can work just as well for smaller wood splitting jobs. Also, remember that the key isn’t sharpness; you’re not cutting wood or even chopping it (a common misnomer); you’re splitting wood.
Wood. Seasoned wood splits better than green wood, but sometimes it make sense to split the wood before you stack it, this will save you some time and an additional step, if needed.
If the wood has nails or metal objects in it, do not split the wood. It’s not worth the risk of damaging your ax or maul, or for that matter your eye when that nail or metal object goes flying. If the wood has bends in it or stumps where branches were connected to it, don’t bother trying to split it with a splitting maul. Accidents happen when you try to split non-uniform pieces of wood. Choose only uniform pieces of wood to split. Even experienced splitters have a hard time safely splitting non-uniform pieces of wood.
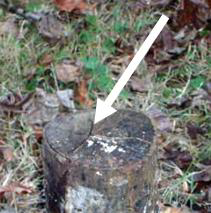
If it’s got a knot in it, skip it, especially if it’s green. You’ll spend all day trying to get through it. The exception is if you can find a line through the center that doesn’t get close to any knot. Then the knots won’t interfere. (“Center” is defined by the grain or splits in the wood, as shown in the figure above.)
Split the Log Along the Lines
Put the piece on its end, on a
chopping block. A chopping block makes the job easier for the beginner and I
always use one because I feel I have more control over the wood being split and
the splitting maul if I use a chopping block. As a last resort you can consider
putting the wood to be split on the ground and propping it, as needed, to keep
it standing. Driving the maul into the ground dulls the maul, supposedly, but
I’ve chopped into dirt countless times and the maul still works to slip wood.
Now place yourself such that when you swing with straight arms, the blade will hit the wood, right in the center. Err on the side closer to you. Here’s why: if you miss on the side close to you, the blade goes into the ground. But if you miss on the far side, the maul handle hits the wood.
Too much of the handle hitting the wood and you’ll be buying a new handle. (It hurts your arms too.)
Set up your safety zone. The safety zone must be at least 20 feet on either side of you, 10 feet behind you and 20 to 25 feet in front of you. Wood slip with a splitting maul can fly a long way. I have had wood, that I have split with a splitting maul, fly over 15 feet in the air before it landed. The longer distance in front of you, protects people and things from the maul if it were to slip out of your hands. Sweat can lubricate the handle of a maul, axe or hatchet causing you to loose your grip during the swing.
Stand with your legs apart with your left foot forward. Tap the maul on the wood where you want the maul to land, pick it up from the wood, pull the maul back towards yourself while sliding your right hand up towards the head of the maul. Bring the maul back over your right should in an upward motion arching the maul forward. When the maul reaches the maximum height of the arch, start the downward motion building up speed and guiding the maul toward the wood to be split. Guide the maul such that the maul face strikes the wood squarely. Remember, let the weight of the maul do the work– not your brute strength.
Try to hit the same place on the log you are trying to split every time. This is hard to do and striking in the exact same place doesn’t really matter. Wood with a slightly ragged edge is not a problem. Sometimes you will get the maul stuck in the wood and have to wrestle it out. Use and up and down motion utilizing the handle of the maul as a lever to accomplish removal.
Eventually the log or piece will split with a nice crack! You may have to follow this up with a few gentle hits into the crack to separate remaining strands of wood connecting the pieces of wood together.
If the piece is bigger, you can still go for the center, but it might be easier to chop pieces off the sides, until you have something manageable.
What You Get
The pieces that you made that
are too small are your best accomplishment. These pieces can be used for tinder
or kindling. Split wood burns easier than branches especially the small pieces.
Sledge Hammer
Sledgehammers can be helpful tools to have around. They can be used to break up concrete and stone tiling. They can also be used to help you drive poles into the ground. Basically you would use a sledgehammer for any type of task that requires more force to be applied than a standard hammer can offer. Using a sledgehammer properly is important for your safety. They can do a lot of damage if you aren’t careful. That said, there are different types of sledgehammers, and you can compare them online at the website in the additional resources section or you can head to your local home improvement store to find a large variety.
Things You’ll Need:
- – Sledgehammer
- – Heavy work gloves
- Safety goggles
How to use a Sledgehammer:
- Put on your gloves and safety goggles. This is an important step because debris may be flying up, and the handle can give your hands painful blisters when used for long periods.
- Grasp the sledgehammer handle with both hands while the sledgehammer head is sitting on the ground and the handle is sticking up. You will need to use your strongest hand on the top toward the head, and the weaker hand on the bottom toward the end of the handle. Make sure that your hands are placed about six inches apart, but not so far apart that you feel strained.
- Bend your knees slightly to avoid back injury from the weight of the sledgehammer.
- Raise the sledgehammer up toward your shoulder. You should be raising toward the shoulder that corresponds to the stronger hand/arm. This will allow you to tap into the power from your strength.
- Bring the hammer down in one sharp, quick movement, using the weight of the sledgehammer to bring it back down. The force caused by the raising of the sledgehammer will aid in the force that it has as it comes back down.
Splitting Wedges
With today’s modern technology, manually splitting wood is no longer necessary if you have access to the proper machinery, such as a mechanical log splitter, which does the work for you at the push of a button. However, without such a tool, wood must be split using conventional tools such as a wood-splitting maul, an axe or a sledgehammer and splitting wedge. Splitting wood by hand requires a touch of technique combined with a little brute force, and using a sledgehammer and wedge is only practical for hard, thick pieces of wood.
The following are the steps in how to use a splitting wedge:
- 1) Prepare the logs to be split, if you have large pieces, by cutting them into “rounds” of about two feet in length.
- Stand a log round vertically on a chopping block or flat-cut tree stump.
- Hold the wedge a few inches from dead center over the outer growth rings in the wood and tap the wedge into place with your sledgehammer. The middle of the log is the hardest part to split, so positioning the wedge off-center or closer to the edge of the round will provide an optimum striking point. If the placement of the wedge causes the wood to tip over, move the wedge slightly back to center until you achieve balance.
- Stand over the wood and hold the sledgehammer at waist level. Bring the sledgehammer up over your head, holding it with both hands. Aim at the striking point on the top of the wedge. Using as much force as you can, slam the sledgehammer down onto the wedge.
- Hit the wedge as many times as it takes for the wood to be split according to your satisfaction. The process may include repositioning the wedge to split the wood into more than two pieces if you desire