Webster’s Dictionary describes a tool as “an instrument (as a hammer) used or worked by hand”, or,” an instrument or apparatus used in performing an operation or necessary in the practice of a vocation or profession (scholar’s book).” In Christ’s day, His tool and the Apostles’ tool was the Word. In today’s world, our tool to do our Lord’s work is still the Word, the Bible.
Worldly tools are many. Using one example, there are many tools available to repair or fix things around our house. Hammer, pliers, and screwdriver are some of those tools.
As Lutheran Pioneers our basic tools around camp include the knife, shovel, saw and axe.
CAMP TOOLS
Knife, shovel (spade), saw, and axe were the tools of the pioneers who settled on this land. They used their knives in hunting and to whittle a number of household items. They needed their axes and saws to fell trees for log cabins and for fuel, and to clear the ground. They used their shovels (spades) to turn the soil and make it ready for planting.
You don’t have
the same need for these
tools today. But they come
in handy for different
tasks while camping. So we need to learn to care for them and to use them in the right way.
KNIFE or MULTI-TOOL:
The camp knife (fig. 1) is the most useful tool in camp.
It has a strong cutting blade and tools as well – can opener, screwdriver, cap lifter, leather punch or awl. You can carry it in your pocket or hang it on your belt using a small rope through the ring in its handle.
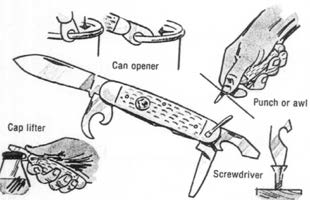
Fig 1
CAMP KNIFE HANDLING: To open your camp knife, hold it in one of your hands, and with your other hand, put your thumbnail into nail slot. Pull out the blade until it snaps into the open position. (fig. 2)
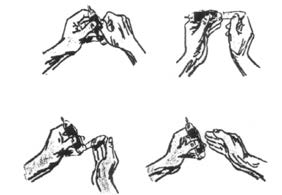
Figure 2
To close your camp knife, hold the handle form the backside in one of your hands, and using your other hand, keep your fingers on the sides of the blade, and push against the back of the blade until it slides safely into the handle. (fig. 2)
When passing your camp
knife to another person, all blades
are to be closed into
the handle. Never pass the
knife with any blades in the
open position.
USING YOUR CAMP KNIFE: For coarse cutting, as in trimming a branch or cutting fire shavings, grasp the handle with your whole hand and always cut away from you. This will help to prevent injury.
When cutting with a knife always be aware of who is around you and who may be in the swing range of your arm. Never cut, shave or whittle when other people are near you. If you slip, you may cut that person.
For fine cutting, as in whittling, grasp the handle with your whole hand, move the knife in short cuts. Never push the blade with your thumb.
OTHER KNIVES: There are other knives that can be used in camp, such as the folding hunting knife and the sheath hunting knife (fig 3). These knives do not have as many uses as the camp knife but they can be used in the same cutting functions as the camp knife. Large hunting knives are dangerous and serve no purpose in camp.
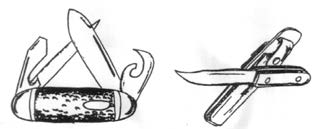
Fig. 3
The folding hunting knife should use the same handling and use techniques as the camp knife. Most of the folding hunting knives have a nice safety feature with a locking latch that locks the blade in the open position. But be careful while closing the blade because it is unsafe using your thumb to unlock the safety latch while pushing the blade back into the handle. Close the blade slowly and carefully.
The sheath hunting knife is not a folding knife and the handle and blade is rigid and one piece. The cutting uses are the same as the folding knives but handling is different. Because the blade and handle is one piece, the blade is stored in a leather or plastic sheath when not in use. Before passing the sheath hunting knife to another person, always put the blade back into the sheath before passing. Never pass the hunting knife to another person with the blade unsheathed.
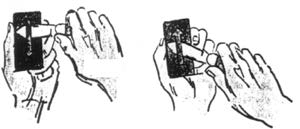

SHARPENING YOUR KNIFE: Always sharpen your knife on a good quality sharpening stone. Lay the blade edge on the stone. Raise the back of the blade slightly. Slowly stroke the edge toward you and off the stone with a slicing action, as if you were cutting into the stone (fig. 4). Turn the blade over and stroke it away from you the next time (fig. 5). Continue back and forth until the edge is sharp over its full length. Some stones recommend the use of oil or water when sharpening your knife blades, be sure to follow the manufacturer’s recommendation as to what to use. Water or oil help to keep the knife blade cool and maintain the temper, or the ability to maintain a sharp edge, of the blade. Wipe the blade when done to clean off small metal shavings.
CARE OF YOUR KNIFE: Your knife is a valuable tool. Take good care of it. Pay close attention to these knife care and safety rules.
- Keep your knife clean, dry and sharp at all times.
- A dull knife is more dangerous than a sharp one.
- Never use your knife on things that will quickly dull or damage it.
- Keep it off the ground. Moisture and dirt will ruin it.
- Keep it out of the fire. The heat ruins the temper or hardness of the steel and then the edge will become dull and useless.
- Wipe the blade after using it.
- Keep the blades closed (folding knife) or sheathed when not it use.
- On folding knives, treat the joints to an occasional drop of machine oil so that the blades keep opening and closing easily.
A KNIFE IS A TOOL, NOT A TOY!
Multi-Tool:
Multi-tools include various features, knife blades and tools all in a self-contained housing. These handy devices pack away into small, rectangular shapes, stored in pouches, pockets or backpacking storage compartments. Depending on the multi-tool, use is determined by the release mechanism and the lock- down function when the particular tool or blade is extended out for use. Keep the multi-tool’s lock mechanism in place when a blade is exposed to prevent unwanted folding or slipping. When using a blade treat the multi-tool as a knife and follow all the rules for knife safety.
There are many other tools in a multi-tool other than the knife. Many of the tools have screw drivers, files, can openers, bottle openers, even scissors. The exact tools within the multi-tool vary so greatly we will only cover the basics of the tool itself. For the best care of the tool always keep the tool in its pouch when not in use. This keeps the tool safe and generally in one place. Always clean and dry the tools after each use. If you do not clean after each use, you may ruin the entire tool.
Whenever you use a tool that is part of a multi-tool, you must lock the tool in place. If you do not, the tool will have a tendency to fold when you put pressure on the tool in order to effectively use the tool.
Screwdrivers folding and pinching your finger can inflict a very serious injury.
Multi-tools should never replace tools with a fixed handle, but for utility and versatility the multi-tool has its place for light uses.
The following are the basic steps to follow in order to use the basic multi-tool. Manufacturers vary the way the tool opens and closes and also the locking mechanism.
- – Press any lock button or sliding lock-mechanism on your multi-tool. Look toward the rear end of the tool for a metal button to press with your thumb or a metal slide that opens the tool.
- – Open the tool as you would open a pair of pliers. If your multi-tool has pliers, look to see if you need to push them out from the housing to gain full use of the tool.
- – Pull out your needed tool from the recessed housing compartment. Look for sliver sized indentations along the edge of the tools where a fingernail slides to gain purchase to pull the tool out.
- – Close the handle of the multi-tool when your desired tool is extended out. Check that the multi-tool’s lock mechanism is in place before you use the extended tool.
- – Open the lock mechanism to change tools. Push the extended tool back into the housing and select another. Close the housing and check it is locked.
Push the pliers function back into the tool, close all extended tools and fold the multi-tool back into the rectangular shape to be stored in the sheath, pouch or pocket.
Always remember to clean the tool before putting it back in its pouch. Any knives in the tool should be kept sharp at all times. If you have screw drivers in the tool, keep the blade edges square and free of nicks or rounded surfaces.
Multi-tools cause the highest injury rates of any tool. This is due to the operator not locking the tools in place before using the tool to do a job.
Please be careful at all times.
SAW:
The saw is the best tool in camp for cutting and preparing wood for camp fires or camp furniture. Remember, never cut any live trees without permission from the tree’s owner. Most, if not all, of the private and public campgrounds do not permit the cutting of live trees.
SAW TYPES. There are many types and styles of saws available for camp use. There are three basic types that work well in camp. They are the bow saw (fig. 6), the folding bow saw (fig. 6), and the folding hand saw (fig. 6)
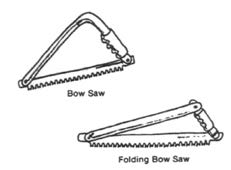
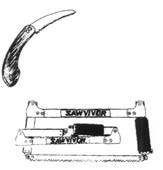
Fig. 6
USING
YOUR SAW. Your method depends on
what you will be sawing. For
general sawing, hold the
wood firmly in place with one hand and use smooth and easy saw strokes. Pull
and push the saw back and forth with very little
downward pressure. Let the sharpness and
weight of the saw do the job for you.
Bucking is the word used for cutting wood into logs or small pieces. For thin wood, place one end of it over a larger log that is laying flat on the ground. Kneel down on one knee and put the opposite foot on the other part of the wood. Saw the end of the wood off so it falls free of the log. (fig. 7) For larger wood, make a simple sawbuck by driving two stakes into the ground to for an X and lashing them together. (fig. 8) For a big sawing job, make a sawhorse by driving four stakes into the ground to form two X’s with their legs across a rather large log. Lash each of the X’s together. (fig. 8)
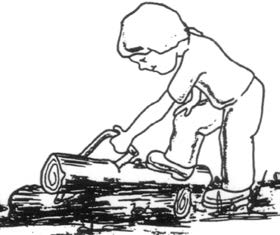
Fig. 7
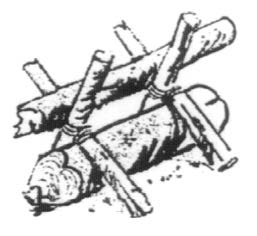
Fig. 8
Limbing is the word used for removing a limb from the main part of the tree. (fig. 9) Cut so the weight of the wood doesn’t bind the saw. If the saw is beginning to bind (saw will become hard to push or pull), remove immediately so you do not ruin the saw blade. Then, saw from opposite side of limb.
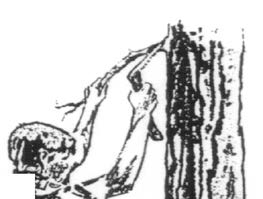
Fig. 9
SHARPENING YOUR SAW. It is easy to touch up the teeth of your saw when they get dull. All you need is a 5-inch ignition file. (fig.10) Hold the saw in your lap and look at the blade; normally, every other tooth has a bevel on one side of the blade and is the same on the other side of the blade. (fig. 10) With the saw across your knees, hold the blade in one hand and tip it up slightly, pressing down with your thumb and pushing up with your index and middle fingers. This will keep the blade snug in your hand while filing. Only on the teeth where you can see the bevel, stroke the file upward or forward on the bevel, only filing on the upward or forward stroke. A few strokes should be enough to sharpen each tooth. (fig. 10) When finished on one side of the blade, turn saw over and sharpen the other teeth using the same procedure just mentioned. An alternate method for sharpening is to simply replace the blade with a new one. Normally, replacement cost is around ten dollars.
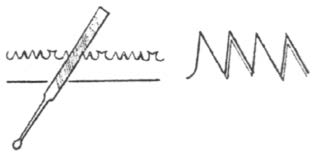
Fig. 10
CARE OF YOUR SAW. Proper care of your saw is necessary because it is a valuable tool in camp and should last you a long time. Follow these simple care and safety rules.
- Keep your saw clean, dry
and sharp at
all
times.
- If the blade forms a kink after being bound while cutting,replace the blade immediately.
- Never use your saw on anything except wood.
- Those teeth can bite (cut), be vary wary and keep your hands away from the blade while cutting, carrying or storing it.
- A dull saw is more dangerous than a sharp one.
- When saw is not in use, fold blade back into handle for the two types of folding saws. For the rigid bow saw, put blade into a sheath. See next paragraph for making an inexpensive sheath.
MAKE A SHEATH FOR YOUR BOW SAW. Using a piece of old garden hose, cut it to the same length as your saw blade. CAREFULLY, cut a slot though one side of the hose. Cut three pieces of rope into 6-inch lengths. CAREFULLY, slide the blade through the slit in the hose, forming a sheath around the blade. Using the three pieces of rope, tie the hose to the blade.
A SAW IS A TOOL, NOT A TOY!
SHOVEL
The shovel, also known as a spade, is the Army-type field shovel where the blade is foldable to make the shovel smaller for storage purposes. (fig. 11) There are many different varieties of foldable camping shovels but this book will use the Army-type for demonstration purposes.
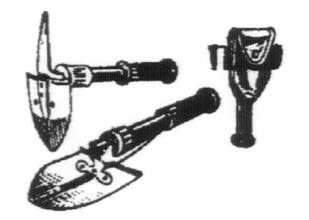
Fig. 11
USING
YOUR SHOVEL. The shovel
has a variety of uses around camp. There is an adjustable nut located between the blade
and the handle that
can be loosened to put the blade
into one of the three positions available.(fig. 11)
One position is the regular
shovel position (fig. 11). Another position is the hoe position (fig. 11). The third
position is the folded or storage
position. Once you have chosen one
of the positions, be sure to tighten the nut so that the blade is rigid against the handle. One of the
uses around camp is the preparing of a fireplace or pit. The hoe position can
be used for clearing the
fireplace area or in the digging of a pit . The
shovel can also be used in the fireplace
area for cleaning up after the fireplace is no longer needed and refilling the
fire pit with the dirt originally
dug up when preparing the pit. Other uses in camp
can be digging a hole for a
latrine (outside toilet) or a garbage pit
. Be sure to refill the
latrine or garbage pit
with the dirt originally dug up when
preparing the hole. Remember,
only place biodegradable garbage in
the garbage
pit. Garbage that is not biodegradable should be carried back home after the campout or placed is proper garbage cans that may be available in your camp area. Clearing the tent area before the tent is set up is another good use for the shovel in camp. There can be many twigs and stones on the ground in the area that you chose for your tent site. Your shovel can be used for other duties in camp that require holes or cleared areas.
CARE OF YOUR SHOVEL. Like all of your camp tools, proper care is needed for the shovel so it can work for you for many years around camp. Here are some care and safety rules that you should remember.
- After using your shovel, clean it and remove all dirt from the blade.
- Be sure the shovel is clean and dry before storing it.
- When using the shovel in the hoe position, be sure nobody is standing in front or behind you while you are swinging it.
- Do not use your shovel for cutting wood. It is not an axe.
·
THE SHOVEL IS A TOOL, NOT A TOY!
CAMP TOOLS SUMMARY
Your camp tools are valuable to you for chores needed to be done in your camp. If you follow all of the suggestions in this chapter pertaining to the use, maintenance, care and safety of your camp tools, your stay in camp will be an enjoyable experience.
REMEMBER, CAMP TOOLS ARE NOT TOYS!
Have a good time in God’s outdoors!