How to Fly Remote Control Helicopters
More advanced simulator practice first:
- If you have CSM, turn all the colors of the model to pure black. This will simulate the common lighting conditions you fly in for real when the helicopter just turns into a silhouette. This is supposed to disorient you because it will be hard to tell if the helicopter is banking away or towards you etc. This happens in real life so you should practice for it.
- Turn the gyro gain channel on your transmitter as low as it can go. This will make you control that tail!
- Practice flying around backwards slowly. This is very difficult
The Real Thing
So you’ve just bought a brand new RC electric helicopter. Congratulations! You’ve just taken your first step into what is for many a very exciting and challenging hobby. This walkthrough will cover learning on the E-Flite Blade CP, but the same principles outlined here apply to learning to fly any RC helicopter.
Don’t expect to be up and flying in one night. Flying a RC helicopter is a challenging, complex skill and can require many weeks of practice and patience to master. Despite their low cost, mini-electrics are actually the hardest to learn how to fly because of their small size and increased instability over the larger gas/nitro helicopters. However, the upside is that if you learn to fly a mini-electric, stepping up to a more expensive helicopter will be a walk in the park. Don’t push your limits too fast in the beginning. Being patient and trying your best to remain in control at all times can save you many blade strikes, crashes, and resulting trips to the hobby shop.
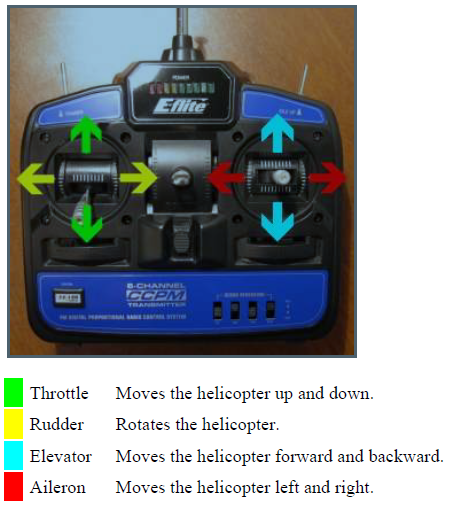
Transmitter Controls
Most helicopter transmitters in North America, including the E-Flite Blade series, are mode 2 transmitters. This means that the throttle/rudder control stick is on the left-hand side (a mode 1 transmitter, by contrast, has its elevator/rudder control stick on the left-hand side, and its throttle/aileron control stick on the right-hand side). The functions for this type of transmitter are outlined below:
Things you need to do:
1. Read the Manual
Unless you’re an experienced pilot, don’t even think about firing up the helicopter without first reading the manual cover-to-cover. Most manuals contain important information such as battery charging and installation procedures, guidance on setting the helicopter’s center of gravity, on- board electronics configuration, tips on adjusting blade tracking, and an overview of the transmitter.
2. Perform a Control Test
Some electric helicopters, such as the E-Flite Blade CP, are test-flown at the factory. Still, it’s a good idea to perform a control test to make sure all of the servos are working properly before you fire up the helicopter. To perform a control test, disconnect the motor(s) from the receiver unit (noting their polarity so you can plug them back in properly), connect the battery on the helicopter, and turn on your transmitter. Move each of the sticks through their full range of movement and make sure all of the servos are moving smoothly without binding (when a servo binds, it makes a buzzing sound). Refer to your manual for more detailed instructions on how to perform a control test.
3. Install Your Training Gear
Using training gear is absolutely critical for a new pilot. Training gear helps stabilize the helicopter and protect it from tipping over and striking the main rotor blades. On the Blade CP, the balsa wood main blades are very delicate and will need to be replaced after only a few scuffles with the ground.
Even if you don’t have skids that fit the clips that come with the Blade CP training gear, the training gear can be adapted to fit many mini electrics using zip ties, which can be purchased at hardware stores.
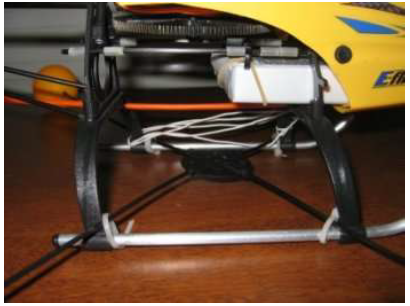
Blade CP training gear mounted on a Blade CP with super skids using zip ties.
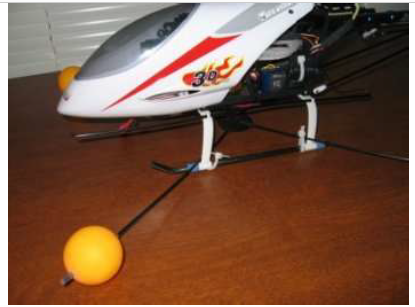
Blade CP training gear mounted on a T-rex using zip ties.
4. Spin Up the Helicopter
Once you have your training gear installed, find a nice smooth and flat surface to practice on. Never practice on grass. An empty garage, a hardwood floor, an outdoor cement patio or a tennis court all work great. If you have access to an indoor basketball court, this is even better. You’ll want a surface area at least the size of a one-car garage. Try to clear the area of as many obstacles as you can. If you’re learning to fly outdoors, avoid learning on windy days. Even if the helicopter is on the ground, a gust of wind can pick it up into the air if it’s light on its skids and may cause you to lose control.
Once you have selected your location, place the helicopter in the center of the area with the tail pointing toward you (it is easiest to learn in this tail-in orientation first because the controls translate nicely to the helicopter’s movement). Turn on your transmitter, making sure any idle-up switches are turned off (on the Blade CP, make sure the toggle switch on the right side of the transmitter is pointing away from you), and move the throttle stick down to its lowest position.
While holding the
transmitter (or at least keeping it within reach), connect the battery on the
helicopter. Remember not to touch the helicopter during the first few seconds
after you connect the battery — the gyro is initializing, and moving the
helicopter at this time can lead to stability problems in flight.
The helicopter will respond to throttle input once the gyro has initialized. Step back about ten feet, and slowly raise the throttle stick to spin up the main rotor blades. The Blade CP and most other mini-electrics will begin to lift off at about 2/3 throttle, so don’t go past that point. Instead, give the helicopter just enough throttle so that it gets light on its skids, but doesn’t try to lift off. When you get to this point, you’ll see the helicopter start to bob up and down.
5. Adjust Your Trim
If the helicopter tries to drift in a certain direction or rotates without any control stick input, you may need to adjust your trim. Move the trim sliders in the opposite direction that the helicopter is drifting. For example, if the helicopter tends to drift to the right, move the aileron trim slider a few notches to the left to counteract the drift. Similarly, if the helicopter’s nose is rotating to the left, move the rudder trim slider a few notches to the right. Adjust each trim slider as necessary so that when light on its skids, the helicopter remains as stationary as possible. Some drifting is normal because the helicopter is fighting ground effect.
If you’ve moved your rudder trim slider all the way to the end of its travel and the helicopter’s rotation in the opposite direction is still not corrected, you may need to adjust the proportional trimmer potentiometer (pot) on the helicopter’s receiver. Refer to your manual for more detailed instructions, but essentially this dial controls how fast the tail rotor spins relative to the main rotor. Turning the dial clockwise makes the tail rotor spin faster, which rotates the helicopter’s nose to the right when spun up. Similarly, turning the dial counter-clockwise decreases the tail rotor speed, which rotates the nose to the left. By trial and error, adjust the trimmer pot so that when your rudder trim slider is close to its center of travel, the helicopter remains stationary.
6. Slide it Around
Now you’re at the
point where you’ll want to be for at least your first few battery packs. With
the helicopter spun up enough to be light on its skids, carefully move the
right-hand stick in different directions and allow the helicopter to slide
around on its training balls. If the helicopter is too responsive, bring down the
throttle a little bit to where you feel comfortable with how fast the
helicopter slides. If you get too close to an obstacle or begin to lose
control, bring the throttle stick down to its lowest position, wait for the
rotor blades to stop spinning, and move the helicopter to a safer location.
7. Let’s Move up to Actual Flight
You may have noticed that once the helicopter starts moving in one direction, it will keep moving in that direction until told otherwise. Mastering this concept is the probably biggest challenge in learning to fly. Hovering a helicopter basically consists of constantly making slight corrections in the controls to keep the helicopter as steady as possible – it’s like trying to maintain your balance on top of a beach ball. When the helicopter is in the air, it is very sensitive to control input and responds much more quickly than it does on the ground. You don’t have time to think about each control movement – you have to do it instinctually. This is why it’s so critical that you spend as much time as you need learning the controls on the ground before you take the helicopter into the air.
Once you’ve gone through several battery packs and are feeling pretty comfortable with rolling the helicopter around, you can try some quick hops. Spin up the rotor until the helicopter is light on its skids. Then, quickly but smoothly move the throttle stick up past 2/3 throttle and back down so that the helicopter “hops” up and comes back down. Try this a few times until you get a feel for where the point of lift-off is.
A common mistake that beginners make when learning to go airborne is throttling down too quickly when they get into trouble, causing the helicopter to slam down hard onto its skids. If the helicopter starts to get away from you, avoid killing the throttle. Instead, try your best to bring the helicopter back into your control while slowly throttling down to come in for a soft landing. Mastering this technique can save you from many hard landings and broken parts.
8. Slowly Increase Your Hang-time
It will take time
to build up the skill needed for hovering. Remember to be patient, and don’t fly
outside of your abilities. Most mini-electrics are delicate machines, and will break if crashed or landed hard. At
first, your hops will only last a second or less. Over time, as you develop
muscle memory on how to manipulate the controls, you air time will slowly
increase. Many people report that there’s a point where everything
“clicks”, allowing them to hover through entire battery packs. As
your skill continues to increase, you’ll be able to hover inside smaller and
smaller areas, move the helicopter exactly where you want it to go, and be able
to handle flying in moderately windy conditions.
9. Learn Side-in and Nose-in Orientations
Once you get pretty good at tail-in hovering, learn to fly in other orientations. Side-in hovering (where the helicopter is turned 90 degrees in each direction from tail-in) is usually a little easier to learn at this point, since the control translates pretty well from the skills you’ve already applied to tail-in hovering. Nose-in (where the helicopter’s nose faces you) hovering, however, is a different story. When the helicopter’s nose is facing you, three of the controls (elevator, aileron and rudder) that you’ve already learned are reversed. Therefore, you must essentially retrain yourself from the beginning.
10. The Sky’s the Limit
Once you master hovering from any angle, you’ll be in very good shape to learn forward, backward and lateral flight, and begin to take the helicopter up to greater heights (just don’t lose sight of it!). Many mini-electrics also have an idle-up mode that allows you to fly inverted, and perform loops and rolls. It’s a good idea to get going with a simulator when learning advanced techniques. If you prefer learning in the real world, realize that the higher the helicopter is the more time you have for recovery if bad things happen.
Things you need to know before leaving this level:
- – Hover in one place
- – Move forward and backward
- – Slide side to side and hover at the ends of the slide