HAMMER
The following are types of hammers:
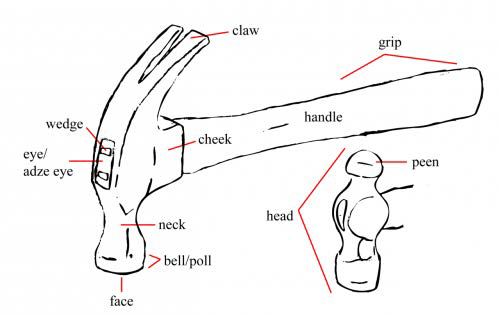
Claw hammer. This is suitable for pounding in nails; the claw part is suitable for pulling nails out. This hammer is more commonly used for woodworking and has a “T” shape, with the head on one side and a “claw” on the other side. It is in the house. See image above.
Ball peen hammer (hardened). This is suitable for driving a chisel or a punch. This is more commonly used for metalworking and has no claw. It has a rounded metallic head.
Mallet. This is also often referred to as a rubber hammer. It is a fairly common type of hammer. It is suitable for delicate work as it has a softer head than most hammers.
Upholstery hammer. This is suitable for upholstery projects; one end is usually magnetic to help with tacks used in furniture.
Lightweight hammer. Suitable for apprentices who are learning.
The parts of a hammer:
The following are the steps on how to use a hammer.
- – Check the hammer before use. Look for firm attachment of the head to the handle. Also check for splinters, loose wrapping, or other defects in the handle. If the hammer has any defects or is wobbly, do not use it. Not only will it require more energy to use but it is an accident waiting to happen
- – Get a firm grip on the handle. This will ensure that you don’t lose your hold on the hammer and have it flying out of your hand
- – Hold the hammer at the end of the handle. Beginners are often more comfortable holding the hammer handle midway. It is more energy efficient to grip the handle firmly at the end, but hold it a bit higher up while you are learning if that feels most comfortable and secure for you. With practice, you will become more proficient at holding the hammer towards the end, affording yourself more leverage
- – Hit your surface squarely with the hammer. Avoid banging a hammer sideways. Hit only with the head of the hammer and do not use the handle or the side of the hammer
- – Use your whole arm and elbow. As well as maintaining a good grip, it is important to rely on the strength of your whole arm and elbow and not just rely on your wrist and hand to pound the hammer with. Most importantly, keep a straight wrist and allow the weight of the hammer itself to do the pounding, not your arm
- – Place your work against a hard surface. Do not try to do hammering work on carpet or other soft surfaces, since it requires more energy
- – Work in a natural position. Beginners, children and the less proficient should hammer at waist height for the greatest ease. If you cannot move your work, keep your position as neutral and as natural as you can
- – Check before you swing. Keep your workspace clear of other objects and check that nobody is standing behind you or too near you when you use the hammer. You need plenty of space to swing the hammer without catching your arm or the hammer on another person or object
- – Practice. Good hammering technique comes from trial and error. You will develop your own technique over time that feels the most comfortable and works best for your projects
Hammers are an important tool, but you need to choose the correct hammer for the specific job.
Rubber Mallet:
The rubber
mallet is a key tool for camping.
You can drive tent
stakes safely or use it for
any job that needs a softer touch than with a metal headed hammer. The rubber
mallet is one of the safest
striking tools and therefore needs to be a part of your camping tool
kit.
Hatchet:
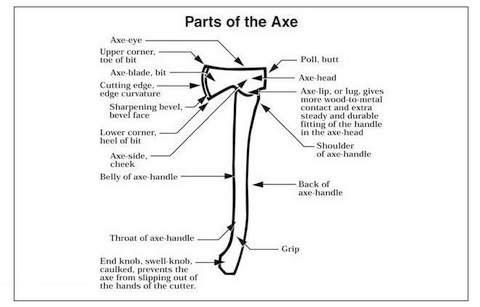
The hatchet or hand axe is a small version of an axe, but designed to be used with only one hand. In order to be able to teach appropriate use of the hatchet you must learn the parts of a hatchet or axe. The figure below lists those parts.
The hatchet, like the axe is a very dangerous tool. The hatchet is mainly used to prepare wood for a camp fire. The hatchet is a good tool to make kindling and tinder. Since the tool is so dangerous you must follow safety rules or people will get hurt. The following safety rules are for the safe handling and usage of a hatchet.
- The hatchet must in a sheath
at all times except when in use.
- The cutting edge must be sharp.
- Clear the area where you are going to use the hatchet of all obstacles
- Develop a safety zone of 10 feet to either side of you, 15 feet in front of you and 5 feet behind you. The safety zone is free of all people and animals.
- Gather the wood you want to split and locate this wood to the left or you, if you are right handed.
- You need to place the wood to be split on a hard or firm surface.
- Position yourself in a kneeling position with the weight on your right knee and your left knee elevated, if you are right handed.
- Support the wood with your left hand, while bracing your left arm on your left knee.
- Check your safety zone to ensure no one has entered the zone.
- Practice the swing of the hatchet to ensure that if you miss the wood you are planning on splitting, the hatchet will be embedded in the ground or hard surface, not your foot or leg.
- Un-sheath the hatchet.
- Use a practice swing to ensure you have good aim at the wood to split.
- Swing the hatchet to split the wood.
- When done splitting wood, sheath the hatchet.
The above list is
a how to use the hatchet and has many steps of safety built in. Safety needs to
be a part of using every camp tool. See the axe section for how to sharpen and
care for a hatchet.
Why Use a Hatchet
It is an unavoidable fact that hatchets and axes are heavy tools. An average hatchet will have a 1.25lb head, which tends to make the whole hatchet close to 2lb. That type of weight must be justified by a significant use value. Whether or not a hatchet will have such high degree of usefulness to you will depend on what you wish to do in the woods. If you have no intention of cutting or processing wood on your trip, then any tool designed to do that, including a hatchet would be unnecessary weight. On the other hand, if woodworking is on the menu, a hatchet can truly shine. It is a simple tool that is nearly fail safe. It can turn fire making into a breeze, and serve every other role in between. The worse the weather conditions get, the more its value shows itself.
AXE
Of all of your camp tools, the axe is the most DANGEROUS. For this reason, the author does not normally recommend that an axe be used in camp. The knife and saw can usually perform all of the cutting requirements needed in a camp. But for the sake of woodsmanship; types, uses, care and safety of the axe will be discussed in this chapter.
AXE TYPES. Axes can come in basically three sizes. The hand axe, also called a hatchet or pack axe is a small, light-weight axe. The axe is called a hand axe because it is to be used with one hand only. The handle is approximately 15 inches long. The three-quarter axe, also called the cruiser or explorer axe looks like the hand axe except it is longer with a heavier axe head. This axe is a two-handed axe. The handle is approximately 24-30 inches in length. The third type is the full axe. This axe also looks like the other two types except it is much longer and heavier. It’s handle is approximately 36 inches long. There is basically two types of axe heads available. The double-edged head has two blades and normally is only available for the full axe. The double-edged full axe was used by the lumberjacks during the great lumbering periods between the mid-1800’s and the early 1900’s. The single-edged head can be used with all three sizes of axes.
USING YOUR AXE. For camp use, the axe does the same functions as your saw; cutting and preparing wood for campfires or camp furniture. Each size axe has its uses, the hand axe for smaller diameter wood pieces and larger diameters of wood for the three-quarter and full axes.
Logging or bucking are the words used for cutting a tree trunk into proper lengths. The two methods of cutting or chopping wood into shorter lengths are the same for all three axe sizes, the only difference is the diameter size of the wood being cut. For both methods, be sure the cutting area is clear, not only just on the ground, but also above and the sides of the area. NEVER allow any persons to be near you during the cutting function. Only you should be in the cleared, cutting area. Wood chips, wood pieces and even AXE HEADS have been known to fly out of the immediate cutting area. This is the main reason that the axe is considered a DANGEROUS tool in camp. The simplest method is to cut the wood while the wood is laying on the ground. This is not the best method but for large diameter logs, this would be the only method that could be used.
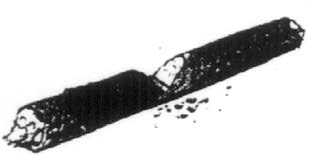
Swing the axe diagonally to cut two notches in the log forming a notch that is as wide as the log is thick. (Figure 1)
Continue cutting notches within the original notch area until more than halfway through the log. Roll log over and continue the notching process until you cut through the log. On smaller diameter wood, you must have wood support under the smaller diameter wood. a large chunk of wood or a downed tree would make a nice support. If using a large chunk of wood as a support, pound wood pegs on each side of the support to hold it in place during the cutting process. Place the stick with the spot where you want to cut on the wood support and cut it in two with the notching method discussed above. (Figure 2)
Lopping or limbing is the process of removing branches from the main portion of the downed tree. Always chop toward the top of the tree -if you chop down into the crotch your axe will very likely stick. For safety reasons, stand on the side of the of the downed tree opposite the branches being cut.
There is one function that only the axe can do well and that is the splitting of larger log pieces into smaller pieces for better burning in the campfires. If you sawed the tree to the proper lengths, use the largest diameter piece as a base in a vertical position on the ground, place a piece to be split on top of the chopping block in a vertical position , stand back to a proper swinging position, swing the axe over your head and strike the piece of wood to be split. Continue this action until the piece has split into two pieces. If you cut the tree into proper lengths using an axe, you will have to lay the piece horizontally on the ground or on a chopping block to cut through the center of the piece. Be careful of the pieces flying off of the chopping block when sticking the piece to be split.
SHARPENING
YOUR AXE. To keep
your axe sharp, hone it regularly
with a dry sharpening stone. Use the stone also for removing
the wire edge that forms when you file your axe due to acquiring
nicks or extreme dulling of the edge.
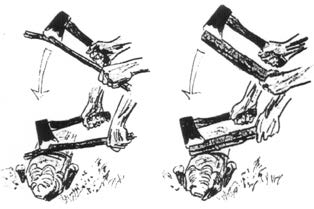
For honing, hold the head of the axe in one hand that in such a way that the handle points up and the edge away from you. Rub the dry sharpening stone on a slight angle over the edge from top to bottom.(Figure 3) Then turn the axe over with the handle now pointing down and the edge away from you. Again, rub the dry sharpening stone over the edge from top to bottom. (Figure 3) Repeat the process until the edge is sharp and smooth.
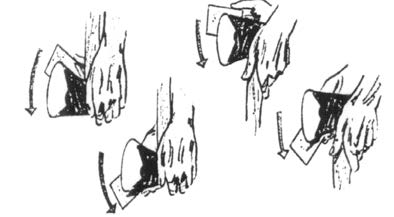
Figure 3
For filing, lean the axe head against a log, with the handle laying on the ground. To steady the filing process, drive pegs in the ground on the outside portion of the axe handle and on the opposite side of the log. File the whole bit with long, even, straight strokes on a slight angle over the edge from top to bottom.(fig.16) Repeat the strokes until you have brightened the entire length of the edge. Turn the axe over and file the other side. Remember that the file is a one-way tool. It’s designed to cut when it is pushed. Push the file downward with just enough pressure to bite into the steel. Return to the starting point and push again. Handle the file carefully. Use a piece of thick cardboard, leather or rubber as a guard on your file. Remove the handle from the file. Cut a small opening in the center of the guard. Slide guard onto the handle end of the file. Slide handle back on to the file.
CARE OF YOUR AXE. Just like the other camp tools mentioned in this chapter, your axe deserves special care. Follow these simple care rules.
- Keep the edge or “bit” sharp – not just sharp enough for it to chew, but sharp enough to bite!
- Be sure the head is on tight. Some axes may need to have a screw tightened or another metal wedge driven into the handle at the top of the steel axe head.
- Never let your axe touch the ground. Driving it into the ground will nick it. Leaving it on the ground will rust it.
- Always have a chopping block under the wood you are chopping or splitting.
- When not in use, cover the blade. Stick in a sheath or bury the head in a log. When carrying it or passing it, have the steel axe head in a sheath.
AXE SAFETY. Because the use of an axe can be dangerous, there are a number of safety rules that you must follow.
- Remember that not only wood but people can get chopped. So keep your friends away when you use your axe.
- Rest when you are tired. An axe out of control is dangerous.
- When you need your axe handy for use, stick the steel head edge in a log. At other times, sheath it.
AN AXE IS A TOOL, NOT A TOY!
CAMP TOOLS SUMMARY
Your camp tools are valuable to you for chores needed to be done in your camp. If you follow all of the suggestions in this chapter pertaining to the use, maintenance, care and safety of your camp tools, your stay in camp will be an enjoyable experience.
REMEMBER, CAMP TOOLS ARE NOT TOYS!
Have a good time in God’s outdoors!