General Directions
A compass can be used in many ways, from telling which way is North to finding hidden treasure or following an unmarked path over wilderness terrain. But first you must learn about how the compass is laid out.
There are four cardinal points on a compass – North, South, East, and West. When reading a compass, and telling other people directions, you need to wipe “right” and “left” out of your vocabulary. Right and Left are relative directions and differ depending on your location and direction, but the cardinal points are constant.
The direction halfway between North and East is an intercardinal point and is called NorthEast. The other three intercardinal points are SouthEast, SouthWest, and NorthWest.
Finally, there are secondary intercardinal points halfway
between each cardinal point and intercardinal point. These are North-NorthEast,
East-NorthEast, East-SouthEast, South- SouthEast, … and so on. With these
directions, you can give someone a fairly good idea of what
direction they need to go. We could add additional points, continuing to break each section in half over and over, but telling someone to go East-EastEastNorthEast-EastNorthEast would not be fun.
Since there is a need for more precise directions, the circle of a compass face is split into 360 marks called degrees. For rough directions, go ahead and use North or NorthWest. But, for finding your way or locating destinations in the wild, use degrees as you’ll see in a bit.
Two Types of Compasses
We will be discussing the mountaineering compass, also called the orienteering compass. This is the type that has a needle that always points north and you need to move a dial to find directions.
You’ve seen compasses in cars or toy compasses – neither of these have a noticable needle and are called “Card Compasses”. Actually, there is a magnetic piece like a needle, but it has a paper disk (card) glued to it or has a plastic ball around it that is free to rotate. As the vehicle turns, the card (or ball) remains fixed so the part you see changes. These are fine for general directions, but not helpful for what we want to do.
Basic Compass Reading
No matter the compass, one end of the needle always points North. On our mountaineering compasses, it is almost always the RED end, but it’s a good idea to test your compass before starting to use it.
If you are north of the equator, stand facing the sun around lunchtime. Whichever end of the needle points towards the sun is South and the end that points at you is North.
If you’re ‘down under’ the North end points towards the sun and the South end points at you. To read your compass,
- Hold your compass steadily in your hand so the baseplate is level and the direction-of- travel arrow is pointing straight away from you.
- Hold it about halfway between your face and waist in a comfortable arm position with your elbow bent and compass held close to your stomach.
- Look down at the compass and see where the needle points.
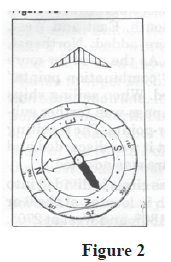
This compass is pointing due North (also 0 degrees)
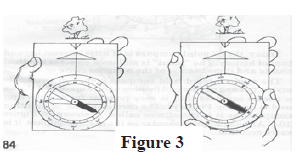
- Turn your body while keeping the compass right in front of you.
- Notice that as the compass rotates, the needle stays pointing the same direction.
- Keep turning until the needle points East like the picture below, keeping the direction-of- travel arrow and North mark facing straight in front of you.
This compass is pointing East (90 degrees)

- Important: This is a very common mistake! The compass needle is pointing towards
East so I must be pointing East, right? No, no, no!
To find my direction, I must turn the compass dial until the North mark and the “Orienting Arrow” are lined up with the North end of the needle. Then I can read the heading that is at the Index Pointer spot (the butt of the direction-of-travel arrow).
Since the Orienting Arrow is usually two parallel lines on the floor of the compass housing, a good thing to memorize is:
RED IN THE SHED
Now we know we are really heading West (270 degrees)
Take a Bearing
By simply moving your compass with your body and using the N-E-S-W markings, you can get a good idea which way you are going. This is often all you need from your compass. But, you’ve probably noticed on your compass, there are also numbers and tiny lines. These represent the 360 degrees in a circle that surrounds you no matter where you are.

When you need to find your way
from one particular place to another, you need to use these numbers to find out
the bearing to that remote place.
The direction you are going is called your heading.
Heading and Bearing are pretty much the same thing. The image above is a
heading of about 250 degrees.
Using your compass, take a few bearings. Move your body until the direction-of-travel arrow points at the following items and then turn the dial until “RED is in the Shed”. Then, read the bearing at the Index Pointer:
- You computer screen: degrees
- Your window: degrees
- Your door: degrees
- A light switch: degrees
Compass Reading Tips
- Hold the compass level – if the compass is tilted, the needle will touch the clear lid and not move correctly.
- Read the correct end of the needle.
- Use common sense, such as knowing that if you are in North America, Europe, or Asia and heading anywhere towards the sun, you can’t be heading north, northwest, or northeast. If you are south of the equator and heading towards the sun, it’s just the opposite and you are heading in a northerly direction. (If you are in the tropics, between the Tropic of Cancer at 23.5 degrees North of the equator and the Tropic of Capricorn at
23.5 degrees South of the equator, then this tip should not be used. The sun can be either north or south of you, depending on the time of year.)
· RED IN THE SHED!
- Keep the compass away from metal objects – even a knife, flashlight, or keychain can cause a false reading if too close to the compass.