How to Choose
In this era of GPS-assisted navigation, hikers may be tempted to forego carrying a map and compass. But it is important to understand that a GPS receiver does not replace these tools, which do not rely on batteries or satellite signals to function. A detailed topo map and a compass are still the primary tools for navigation in the wilderness.
A compass helps you orient the map, identify features and pinpoint your position. True, you may hike for days on a trail and never even look at it, yet if you take a wrong turn or a whiteout blows in, a compass (in tandem with a map) suddenly becomes one of the most important tools in your pack.
The ability to navigate with map and compass is a crucial wilderness skill, especially if you travel off-trail.
Types of Floating-needle Compasses
Floating-needle compasses, as opposed to digital
compasses, are those that use a magnetized needle that aligns with the earth’s
magnetic field. Needle housings are often filled with a liquid that steadies
the needle, making precise readings possible.
These traditional compasses can be categorized as follows:
Basic compasses: These are good, inexpensive choices for beginning adventurers, day hikers and backpackers who stick to trails. They have all the essential components but lack some bonus features, such as declination adjustment or a mirror. Example: Suunto A10 Compass.
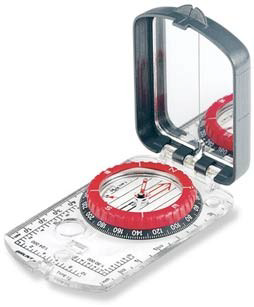
Advanced compasses: These are full-featured models with many extras (e.g., mirror, magnifier) that improve accuracy and make navigation easier. They are well worth the added cost if you regularly travel off-trail or deep into the backcountry. Example: Silva Ranger CL Compass.
Accessory compasses: The type found on keyrings or watches, or small round compasses with no base plate. They accurately point toward magnetic north, but are designed more for fun and quick reference than serious navigation. Example: REI Therm-o Compass.
Basic Compass Features
Backpackers customarily use what is known as a “base plate” or “orienting” compass. (“Orienting” refers to the act of determining your exact position; “navigation” is the process of determining your destination and guiding yourself toward that objective.)
The most common features of a basic compass include:
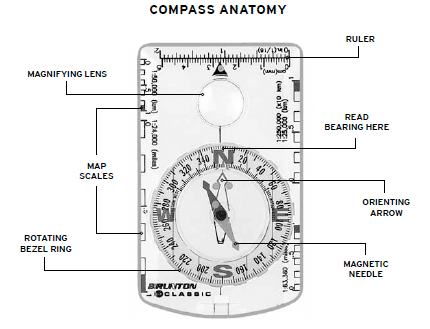
- Magnetized needle: Usually the red end of a pivoting compass needle. This end points to the strongest magnetic field, which is usually the magnetic North Pole. “Magnetic north” is different from “true north”—the geographic North Pole, where all longitude lines meet. Magnetic north, one of earth’s 2 magnetic poles, lies in an island chain within the Canadian Arctic. True north and magnetic north are separated by more than 1,000 miles. When working with a map, you must compensate for the difference between true and magnetic north. This can be accomplished in various ways.
- Liquid-filled capsule: The housing (or dial) that contains the needle and damping fluid. This nonfreezing fluid slows a needle’s jiggling and brings it to rest quicker than an air-filled housing. At high elevations or in cold temperatures, the liquid may contract and create a bubble. A bubble will not impact accuracy. Bubbles disappear when a compass is returned to normal conditions. If the bubble does not disappear, place the compass in the direct sun light for a few hours and this should reduce the size of the bubble or make it go away.
- Rotating bezel (or azimuth ring): A ring marked with degrees from 0 to 360 (preferably in 2° increments) that encircles the outer edge of the compass capsule. The smaller the interval of degrees on the bezel, the easier it is to take an accurate bearing. The bearing or “azimuth” is the direction you wish to travel (expressed in degrees); it is an angle relative to north.
- Base plate and ruler: The base plate is a rectangular, transparent base where the capsule sits. Better compasses have rulers (in inches and centimeters) etched into the “straight edges” of the plate. These are helpful when measuring distances on a map. Try to select a compass that offers scales you are likely to use. Common topographic map scales are 1:24,000 (used by the USGS)and 1:250,000. A long straight edge is helpful for drawing bearings on a map.
- Orienting arrow and parallel meridian lines (or, north-south lines): Located on the bottom of the compass housing. The nonmagnetic arrow’s directional end is usually red and, coupled with the meridian lines (which you align with the north-south lines on a topographic map), helps orient the compass to the map.
- Index line or direction-of-travel line: Located at one end of the base plate. This is the point of the compass dial at which you set or read your bearing measurement.
Advanced Compass Features
The most common features of more-advanced compasses include:
- Declination adjustment: A more sophisticated orienting arrow, one that can be aligned to reflect the “magnetic declination” in your area of travel. (This is the difference between true north and magnetic north.)
In many cases, a tiny adjustment tool, usually connected to the lanyard, is used to turn a small screw on (or near) the compass housing. When adjusted, the orienting arrow is no longer parallel with the north-south lines; instead, it will be offset for the declination of your area of travel. This allows you to easily line up the magnetic needle with magnetic north while taking your bearings. New adjustments can be made for each trip.
A fixed orienting arrow, meanwhile, requires you to “do the math” and make manual adjustments for each new measurement. (Some people use a piece of tape to mark the angle of declination on an inexpensive compass.) An adjustable arrow, though, allows you to “set it and forget it,” a very nice convenience.
- Magnifying lens: A small lens mounted into the base plate; handy for reading tiny map symbols.
- Sighting mirror: This fold-out surface improves your ability to make precise readings. When the mirror is partially folded open, you can sight through a notch in the top. This allows you to simultaneously see your bearing and sight on a distant landmark. It also doubles as an emergency signaling device or personal mirror.
- Luminescent indicators: For night travel, these are good to have on your magnetized needle, on both sides of your orienteering arrow or even on the bezel’s 4 cardinal points.
- Clinometer: Allows you to measure the vertical angle (steepness) of a slope; helpful for assessing avalanche hazard and the heights of objects.
- Global needle: A useful feature for those who explore in the Southern Hemisphere. Due to variances in the earth’s magnetic field, a compasses needle designed to spin freely in North America may tilt or drag in other parts of the world. Compasses with global needles compensate for these variances and spin freely and accurately worldwide.
- Lanyard: A piece of cord that allows you to attach a compass to a belt, pack or, for orienteering, your wrist.
Digital Compasses
These compasses offer some of the same features as floating-needle compasses, but their digital displays make them easier to read. They are battery-powered devices and require calibration, so they are not as readily reliable as traditional floating-needle compasses. Always carry extra batteries when relying on a digital compass for navigation.
Compass Tips and Terminology
- Ferrous metal can distort a compass reading, so be sure to take bearings away from your car, camera or other metallic objects. Magnetic interference can easily alter a compass reading enough to mislead you. So, if you are plotting bearings at a picnic table, check to see if your compass is being exposed to metal bolts or brackets that may affect its accuracy. Electrical fields (a running car engine, for example) can also throw off the accuracy of a compass (true for both floating-needle and digital compasses).
- Be careful where you store a compass. For example, do not store a compass on top of a stereo speaker, which is equipped with a powerful magnet, or a place exposed to strong electric current. Do not place it in your pocket next to your cell phone. Over time, such exposure could demagnetize the needle. A compass responds to the dominant magnetic fields in its vicinity; you want it to be the earth’s.
- Be aware of regional magnetic zones. Compasses not only need to be held level to “swing” properly, they need to be appropriate for the latitude. In general, the earth has 5 different magnetic “dip” zones. These areas can cause a compass needle to drag against the housing, affecting the accuracy of a bearing. Fortunately, the contiguous United States all falls within the same magnetic dip zone.
Note: Most compasses correct for dip by slightly unbalancing the needle. This works fine as long as you stay near the same latitude. If you visit a place with a much different latitude (say, the Southern Hemisphere), your compass may not work properly. Some compasses are specially designed to work anywhere on the planet.
- The 4 principal directions shown on a compass—north, south, east, west—are known as
cardinal points. The face of a compass is sometimes referred to as a compass rose.
- A bearing (also known as an azimuth) refers to the direction of travel—expressed in degrees—you follow to arrive at a destination.
Note: To avoid confusion when communicating with others, it is helpful to express all bearings with the north references. For example: 30 degrees true; 10 degrees magnetic.
Bottom line: A compass remains an essential tool for safe wilderness travel. Strengthening your grasp of map and compass skills through practice and field work will make you a more self- assured backcountry traveler.