Equipment
Helmets
Helmets simply make sense in all riding conditions. At least 21 states and Washington, D.C., even have laws requiring them.
Here are some tips for choosing a bike helmet model that is well-suited to your needs.
Which Type? (Sport, Road or Mountain)
Cycling helmets come in 3 basic styles: sport (also called multi-use), road and mountain. All types are designed to protect a rider’s head from impact while being lightweight and comfortable. The differences:
- Sport (multi-use) helmets ($35-$60): An economical choice for recreational, commuter, road and mountain bikers; also popular with skateboarders and inline skaters.
- Road bike helmets ($60-$250): Preferred by roadie enthusiasts for their low weight, generous ventilation and aerodynamic design.
- Mountain bike helmets ($35-$200): Designed to ventilate well at low speeds; distinguished by their visors, enhanced rear-head coverage and a firm, secure fit for tackling rough terrain. Often used by cyclocross riders, too.
Find the Right Size
A good fit is vital. Multi-use helmets usually offer a single, adjustable size. Most others come in small, medium, large or extended sizes.
To find your size, wrap a flexible tape measure around the largest portion of your head—about 1″ above your eyebrows. Or, wrap a string or ribbon around your head, then measure the length of string with a straight-edge ruler or yardstick.
Look for a helmet size that matches your measurement. On REI.com, the size range is listed under the “Specs” tab on each product page.
General sizing parameters for adults:
- Small: 20″-21.75″ (51cm-55cm)
- Medium: 21.75″-23.25″ (55cm-59cm)
- Large: 23.25″-24.75″ (59cm-63cm)
- Extra-small, extra-large: Below 20″ (51cm), above 24.75 (63cm)
- One size fits all (men): 21.25″-24″ (54cm-61cm)
- One size fits all (women): 19.75″-22.5″ (50cm-57cm)
Most kids’ helmets are one-size-fits-all with a range of 18″-22.5″ (46cm-57cm). Some adults with smaller heads can wear these comfortably.
Between
sizes? Opt for the smaller size.
Adjust Helmet Fit
Almost all helmets offer a universal-fit sizing wheel on the back of the helmet’s internal sizing ring. Chinstraps are adjustable, too. A few helmets, most often kids’ models, offer a selection of internal pads to fine-tune the fit.
To adjust the fit, first expand the sizing wheel before you place a helmet on your head. Once the helmet is in place, reach behind your head and tighten the ring (usually by twisting a dial) until you achieve a snug fit.
A good-fitting helmet should be snug but not annoyingly tight. It should sit level on your head (not tilted back) with the front edge no more than 1″ (a width of approximately 2 fingers) above your eyebrows so that your forehead is protected. Push the helmet from side to side and back to front. If it shifts noticeably (1″ or more), adjust the sizing wheel (or pads) to snug the fit.
Next, buckle and tighten the chinstrap. Push up on the front edge of the helmet, then up on the back edge. If the helmet moves significantly in either direction (more than 1″), tighten the chinstrap and try again. The straps should form a “V” as they rest under each ear. Adjust the straps around both ears to achieve a comfortable fit.
Finally, with the chinstrap buckled, open your mouth. The helmet should press against your forehead as you do so. If not, tighten further and repeat. Just don’t over tighten the strap until it’s uncomfortable.
How To Choose A Saddle
Bicycle saddles take the brunt–of complaints from uncomfortable riders and of more than half a cyclist’s weight. They also rank as a high-wear component. Consider a seat’s scuff-prone vulnerability should your bike hit the ground, or the breakdown caused by your sweaty derriere sliding around on it for hours. Like shoes, a saddle is a personal-fit item that needs to be tried on for size. So before you start sampling, here’s what to look for in a seat.
SHAPE:
Different shapes abound to suit many body types and uses. The ischial tuberosities, or sit bones, of females are generally more widely spaced than those of males–hence women-specific saddles are wider. Gender aside, a seat that’s too wide will chafe and rub, while one that’s too narrow will make you feel like you’re straddling a banister. The profile of seats varies as well: Viewed from the front, some are flatter with squarish sides, others curve steadily and are more round. Some companies offer dedicated models for triathlon (thicker padded nose for forward positioning) or off-road freeriding (thick padding overall and a rugged cover). A few saddle manufacturers now even supply shops with special pads to measure your sit-bone width, to help take the guesswork out of picking the right-width seat.
SHELL AND CUTOUT DESIGN:
The hard, structural shell is made from injected-molded plastic, typically nylon. Sometimes carbon fiber is mixed with the plastic to lower weight and tweak flex characteristics, while a few models sport an all-carbon shell for less weight and more zoot. The shell determines how the seat flexes and gives under a rider’s weight. In recent years many shells have incorporated holes, slots or grooves through the nose section, all promising additional comfort. “Saddles with a cutout in the nose work best for about 80 percent of riders by shifting pressure away from soft tissue and toward the ischial tuberosities,” says Andy Pruitt, Ed.D., who’s done extensive research on saddles as the director of Colorado’s Boulder Center for Sports Medicine, and as a consultant for Specialized. “Solid-nose saddles still work best for some, particularly cyclists who naturally sit crooked on their seats.” Then there are traditional tensioned leather saddles that use a piece of cowhide riveted to a frame on the rails, rather than the plastic sandwich system.
PADDING:
This is what gives a saddle its squish. Urethane foam is most commonly used, along with polymer gels, which have a rubbery, flesh like consistency that offers a reassuring feel to many. Sometimes different padding materials are used on a single seat to add comfort at high-pressure areas. Foams and gels alike are molded onto the shell, with the thickness and density of the padding varying across different models of seats. More padding doesn’t mean more comfort. “If your bike fits properly overall the seat can be pretty hard,” says Pruitt. “Some padding is needed to help disperse that focused pressure point over a slightly bigger area. But when you sit on overly thick padding, it can deform and migrate to places where you don’t want pressure, like between the sit bones,” says Pruitt. Or, if you want nothing between you and your carbon fiber, there are flyweight saddles with no padding at all.
RAILS:
Until about 15 years ago, virtually all saddle rails were made from cheap, heavy, chrome-plated carbon steel. Then titanium came along and lightened things up, and today remains the material of choice for most high-end seats. Strong, light steels such as chrome-moly, often in hollow tubular form, are also common. Carbon fiber is not only ubiquitous but also easily gouged by sharp seatpost clamps; it’s found in the rails of some pricey seats, where it’s often wrapped in aluminum for toughness. A few companies use a proprietary monorail or beam system, with a dedicated seat.
COVERING:
The smooth, outer skin can be leather (cowhide, or even exotics like alligator or snake skin), synthetic leather (Lorica), or assorted kinds of fabrics and plastics, including bulletproof Kevlar. Some are perforated with tiny holes, which add a bit of friction to keep you from sliding around. Off-road saddles can take a beating, with the reinforced corners found on some models offering increased durability when bike meets earth. Color options let you stylize your ride, but basic black hides wear and fading best.
Upright Riding Position
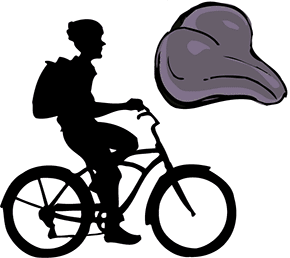
Upright Riding Position
-sitting completely upright, pedaling slowly
-all your weight directly on the seat
Ideal Saddle Type: Cruiser saddle
-a wide, cushioned seat works best body, so a little extra seat width doesn’t
interfere with leg movement.
Features: Very wide, fully padded, may include springs or gel
Ideal Bike Types: Cruiser bikes; some comfort and hybrid bikes
Ideal Riding Style: Casual, leisurely, slow pedaling cadence
Notes: Notice how the rider has almost all of his weight resting over the seat. This makes the wide saddle shown perfect because it offers an ample platform for support and includes plush padding to cushion most of his body weight. Plus, this cyclist pedals at a leisurely to slow pace with his feet slightly ahead of his
Regular Riding Position
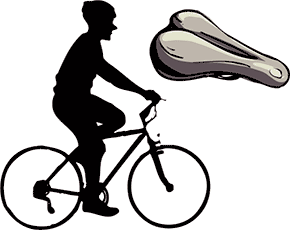
Regular Riding Position
-leaning forward slightly, pedaling fast
-some of your weight supported by handlebars and pedals
-a medium-width, medium-padded seat works best
Ideal Saddle Type: Sport Men’s and Women’s models
Features: Anatomic/ergonomic design, may have cutout in top, medium padding (maybe gel), narrow nose, width of rear should match your sit-bone width
Ideal Bike Types: Flat-bar road bike; mountain bike; hybrid bike; city bike; etc.
Ideal Riding Style: Fitness, commuting, pledge rides, touring, all-around road and trail use, medium to fast pedaling cadence
Notes: For recreational riding where you sit upright and lean slightly forward transferring some of your weight to the pedals and handlebars, a medium to narrow saddle with an ergonomic design and a moderate amount of padding is usually best. Riding this type of bicycle you maintain a fast pedal rate and appreciate less width in the nose so it won’t interfere with your thighs.
Pro Riding Position
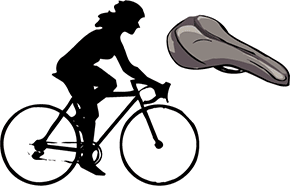
Pro Riding Position
-very forward, pedaling very fast
-weight supported by seat, bars and pedals
-a narrow, lightly padded seat works best
Ideal Saddle Type: Racing Men’s or Women’s models
Features: The narrowest and lightest seats, lightly padded, sometimes feature cutouts in the tops, rear width matches your sit bones, may be anatomic/ergonomic
Ideal Bike Types: Road bikes; road-racing bikes; tri bikes; racing mountain bikes
Ideal Riding Style: Fast, fitness, fun, century, race, fast pedaling cadence
Notes: Cyclists who ride fast and hard or for competition require seats suited to their forward position and rapid pedal cadence. Notice how the rider has much of her weight over the handlebars and pedals. She’s so far forward you can see that she’s resting near the middle of the saddle, too. This means less weight is on the seat, which is why these riders can get by with such minimal designs. Also, it’s the perfect position for fast pedaling, for which a narrow saddle like this is ideal.
Padding Pointers
One common “test” that often leads to selecting the wrong saddle is the “thumb” test, where you base your purchase on how soft the seat is when you press your thumb into it. If the saddle is for the upright riding position, such as on a cruiser, this test usually works. If you’re choosing a seat for longer rides, however, lots of padding probably isn’t what you want.
As you ride longer distances, you pedal at a higher pedal rate and remain on the seat more. For this, it’s more important that a saddle support your weight than it is for the seat to absorb it. In fact, heavily padded seats usually become uncomfortable the longer you ride because the padding begins to put extra pressure right where you don’t want it, which can cause the numbness and pain you were hoping to avoid.
In short, a little padding built into the saddle in the appropriate areas to relieve pressure on sensitive areas works. Squishy, bulky padding that’s impressive to the touch usually causes problems if you ride for exercise or distance.
Width Watch
People come in different widths, and saddles do, too. Ideally you’ll find a seat with a rear shape that fits the width of your posterior. The right saddle will support and cushion you in just the right spots.
If your sit bones are too wide or narrow for a certain seat, you won’t benefit from any of its features because it doesn’t fit you correctly. If you have a saddle you’ve been riding, you can usually see the slight indentations or marks formed right where your sit bones rest, and this gives you a gauge in selecting a new saddle to make sure it’s the right width. It’s also possible to measure your sit bone width with a ruler and use the measurement to select the right-width saddle.
Your sit bones should be centered over the rear of the saddle. Often there are anatomic bumps in the area for this purpose.
Cutouts & Cutaways
An interesting and effective innovation you’ll see in many modern saddles is a cutout or cutaway in the top, which looks like a groove or hole has been cut out of the top of the saddle. The idea is to remove the part of the saddle that’s usually responsible for pressuring sensitive tissues and causing numbness and pain.
Different saddle makers have different ideas about the best shape of the cutout and whether it should go all the way through, be a deep groove or maybe just a slight recess. What’s important is that you select a saddle that feels right to you. If the cutout is in the wrong spot for your anatomy, it won’t do any good. So, it’s important to sit on a seat and get a feel for which design works best.
Top Tips For Ending Saddle Sores
• Try Lots Of Seats – Within each saddle category there’s a great variety of models, designs and features. To select the right one may require visiting our store and sitting on some different models. We can also point out our most popular models for the type of riding you do.
• Ask Your Friends – If you ride with friends, ask them what they recommend, too. While everyone’s anatomy is a little different, you might find that the seat your buddy loves works for you, too. Plus, she’ll probably let you take a spin on hers to find out how it fits and feels.
• Check Seat Height & Angle – A common cause of saddle sores is a seat that’s adjusted wrong. Make sure yours is set level with the ground and at just the right height so that when the balls of your feet are on the pedals, you have a slight bend in your knees when they reach 6 o’clock (bottom of the pedal stroke). If the seat’s angled down, set too high or low, it will cause discomfort and pain. If you need to tip the seat angle a bit, never angle it more than 3 degrees up or down. Be sure to ask if you have any questions or need help adjusting your seat. We can help and we’re expert at fitting seats and bicycles.
• Ride More – You have to get used to sitting on a bicycle saddle. So, don’t give up on one you think should work until you’ve put together a few weeks of rides. By that time, you should know if the seat’s right or not.
• Move Around – Many cyclists get in the bad habit of sitting in one spot on the seat, which is a likely cause of numbness and pain. The solution is simply moving around on the saddle occasionally to change the pressure points. And to stand about every 15 minutes to take all the pressure off the seat.
• Dress For Cycling – You can get by with any old clothing if you’re idling around on a cruiser with a wide, padded saddle, however, once you start riding faster and farther, proper cycling attire makes a huge difference in comfort. Here’s why: street clothes, such as jeans and cut-offs include seams in the worst possible place, the crotch. When you’re riding, you’re essentially sitting on these bumps, which can cut off circulation and cause chafing leading to numbness, pain and problems. This is why we recommend cycling shorts, which feature flat seams and padding in the crotch area, plus moisture-wicking fabric to keep you dry and comfortable no matter how far or hard your ride. And, don’t worry, there are
different styles, not all are skin tight.
Bike Racks and Bags:
How to Choose
Whether you use your bike to commute, run errands or take longer trips, you’ll want to carry more than just a tube-repair kit. A daypack or messenger bag is good, but some of your best gear-carrying options are baskets or bags that fit on your bike.
Typical Bike Bag Setups
| Bike Commuting | Running Errands | Bike Touring |
| Seat bag or rack trunk for tools, tubes and small items | Seat bag for tools and tubes | Seat bag for tools and tubes |
| Daypack with sleeve for laptop, lunch and other basics | Front basket for medium-size items | Handlebar bag for map, snacks, phone and other small essentials |
| Rear rack and panniers for books, clothes, shoes | Rear basket for a large grocery bag | Front rack and panniers for small or soft items |
| Rear rack and panniers for large grocery bags | Rear rack and panniers for large items such as camping gear or clothes |
Rear and Front Racks Rear Rack
A rack provides a stable framework to hold gear on your bicycle. In good weather, items can be strapped directly to the rack without a cover. For foul weather or the ability to hold loose items together, rack trunks and panniers can be easily attached to the rear rack. These offer a secure and balanced way to carry your gear in all conditions. Shopping considerations:
- Rear racks are usually rated to carry loads between 20 and 50 pounds, which is sufficient for most uses.
- A few heavy-duty touring models are able to carry up to 80 pounds. These racks have 3 supports per side (others have only 2).
- Most bikes have braze-on mounts to accept the bolts that attach a rear rack. If your bike does not, you can still mount a rack using metal C clips included with the mounting hardware. These clips wrap around your bike’s frame tubes and accept the lower mounting bolt.
Front Rack
A front rack offers an additional mounting spot for gear. It is a secondary option after a rear rack as it adds weight to the bike’s front wheel and can affect steering and balance. Front racks are popular mostly with touring cyclists who carry large volumes of gear.
There are 2 styles of front racks:
- A standard rack (also called a “top mount”) maximizes gear capacity as the load can be carried above the front wheel as well as hung off the sides.
- A low rider rack accepts bags only on the sides but holds that weight closer to the ground for better balance.
Types of Bike Bags Panniers

Named after the French word for baskets, these rear bags are a popular way for commuters and other cyclists to carry their gear. Panniers offer roomy storage, protection from weather and the ability to quickly disconnect from the rack so you can take your gear with you. They attach to racks using a simple system of spring-loaded hooks, clips or bungee cords. They can be used singly or in pairs.
Small items tend to get lost in large panniers, so consider using stuff sacks to get organized. For example, you can stick tools in one sack, keys/wallet/phone in another and snacks/energy food in a third. This reduces the need to dig around.
Baskets
Baskets can carry loads on the front and/or back of your bicycle. Rear baskets are usually mounted on either side of the rear wheel. They can carry tall loads, as they have no lid. Front baskets tend to be smaller than their rear-mounted cousins; they are most often hung off the handlebars or anchored to the front fork with metal stays.
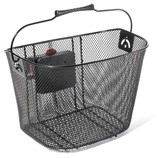
Best use: Baskets offer fair-weather riders an easy way to carry a range of items. Large rear baskets are ideal for runs to the grocery store since most are sized to fit 1 large grocery bag per side.
Seat Bag
Also called a saddle pack, saddle bag or underseat bag, this fits under your bicycle seat and usually attaches to the rails of the saddle itself.
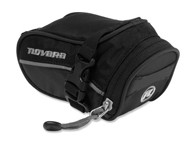
Most hold small items like a multi-tool, spare tube, tire levers, a patch kit or an energy bar. Larger models can carry a few extra items. Keep this mounted to your bike to ensure you never leave home without the essentials.
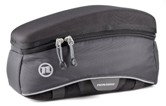
Handlebar Bag
This attaches to your handlebars with clamps or straps. It offers easier access and often more room than a seat bag, so it’s perfect for a camera, sunscreen or snacks. Some models feature a clear plastic sleeve on top to display a map-a popular choice among touring cyclists.
Caution: Be sure the bag you choose does not affect your ability to operate the
brakes or shifters on your bike, and do not overload them as extra weight carried
up this high can affect balance.
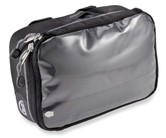
Rack Trunk
This stable bag mounts on top of your rear rack using either straps or a tack system. Rack trunks are smaller than panniers but larger than seat bags, making them a happy medium for some or a simple way for others to add capacity. Many have plastic sheets to reinforce the base area and retain the shape of the bag. Packing is simplified by some sort of pocket system or divided storage. Some trunks even offer integrated rain covers.
.
Tips on Buying and Using Bags Adjustability
Some bags adjust via compression straps or expandable collars. This allows you to carry loads of varying sizes without having the unused portion of the bags flapping in the wind or the load shifting as you move on your bike.
Ease of Access
As noted earlier, handlebar bags are more accessible than panniers or seat bags. Other considerations: How many openings are there? Zippers or flaps? Are there small pockets for organization or simply a large, undivided space? Some riders care about this; others, not so much.
Water Resistance
If you’re an all-conditions rider who doesn’t shy away from rain and road spray, look for a bag rated as “waterproof” instead of “water resistant.” Waterproof bags are made from a rubberized material to keep the contents dry even in a downpour.
Attachment Options
If you park in public areas, you’ll probably want to take your gear with you. A fixed set of baskets may not be the best option; choose panniers instead. For seat bags, look for one with a quick-release mounting bracket rather than a set of buckles or hook-and-loop straps.
Load Balancing
Avoid carrying loads too high on your bike-it can impair your steering or ability to stay upright. Loads carried on a rear rack affect bike handling less than loads carried in front. The lower you can carry a load the better. A fully loaded bike must not impair your ability to avoid obstacles, other riders or cars.
Panniers
do not need to be used as a set. If you only have enough gear to fill one, it’s
best to load one and hang it off the right side of the bike so it does not
stick out into traffic. If the rack and pannier are securely mounted, you will
not even notice the absence of a bag on the other side.
HOW TO CHOOSE A LIGHT
LED based head lights are the most durable and long lasting, so therefore I am going to be recommending them as the light to choose for a bike. They come in many styles and sizes, from a single LED to multiple LEDs in one light.
LEDs (Light Emitting Diodes) aren’t really bulbs at all, but rather tiny semi conductors. You can find them just about anywhere in your daily life from your alarm clock, to your TV remote. LED’s are even less expensive and more rugged than halogen bulbs. They are a little more complex in the circuitry, and not as repairable, but since they rarely stop working, it isn’t usually a problem. They don’t produce nearly as much heat, so their battery longevity is many times longer than that of halogen lights. The technology of LEDs accelerated in the last decade, and now by clustering several LEDs or focusing them with good lenses, you can get quite a bit of light out them.