Fishing Basics
Fishing is a great past time and a way to enjoy being out in God’s great creation and that could just mean enjoying a lake nearby. Fishing can be time well spent with friends and siblings making bonds that could last a lifetime. In order to enjoy fishing we need to learn how to fish. This topic will present the basics of fishing and some different styles of fishing.
Equipment
The Rod:
I start everyone out fishing with an ultra-light rod and reel. The rod is a 5’ 6” ultra-light rod and can be from any manufacturer. The reason behind the ultra-light rod is that you can teach technique easier. When the person casting gets all parts of casting right the casts go in a straight line and can reach 50’ to 75’ in length. When things are not right, the error is magnified and even the person casting can usually tell what they did wrong, so it is the perfect teaching rod.
Fishing line:
The line I use on an ultra-light rod is 6 pound test line. It is very flexible and is almost invisible to the eye. The line I use is a clear monofilament line, but now they have colored lines and braided lines that make seeing the line when you cast easier. The 6 pound test line is great for pan fish, perch, and even small bass. You need to play the fish and bring them in slower than if you had a larger test line on the rod, but bringing in any fish, no matter the size, is fun!
The reel:
I use an
ultra-light reel that holds about 200 yards of 6 pound line. I use an open bail
reel otherwise known as a spinning reel. The open bail helps you keep track of
knots in the line and you can see if the line is spooling correctly on the bail
after every usage. Even after many years of fishing I still find that I knot up
the spool and have to resort to untangling it or cutting the line off of the
spool. Some people prefer the closed bail, or spin casting, type reel. I find
no difference, except that I was taught by my father on an open reel and
therefore choose to use that type over the closed.
Bobbers:
Bobbers are plastic floats put on the line to keep the bait suspended in the water. Depending on where I go I usually start out with the bobber set about 12” above the hook on the line. I adjust this up and down the line depending on the depth of the water or where it seems the fish are biting best. Bobbers come in many styles but I prefer to use two basic styles, the round bobber and the pensile bobber. The round bobber is round with a line catch on the top and bottom of the bobber to keep the bobber affixed to the line and prevent it from moving up and down the line. The pensile bobber kind of looks like a pensile, thin and long. This type of bobber usually only has a single line catch that is located at the bottom of the bobber. The main reason for using a pensile bobber is that they are more sensitive to show when fish are nibbling at the bait.

Round bobbers are attached like the above picture
Lures (Hooks):
You are starting out and the basic way I teach everyone is to use a hook on the end of a line with a sinker about 6” up the line from the hook and a bobber another 6” up the line from the sinker.
An ultra-light rod and reel setup with 6 pound test line, I usually use a #10 hook. Sometimes I use a larger hook but I usually never go over a size 6 hook on my ultra-light. Hook sizes are backwards. The larger number the smaller the hook. A number 24 is smaller than a number 6.
There are many
other lures on the market and depending on what type of fish you are fishing
for and what type of fishing you are doing, they may work for you. We will go
into some of these other lures later in the series.
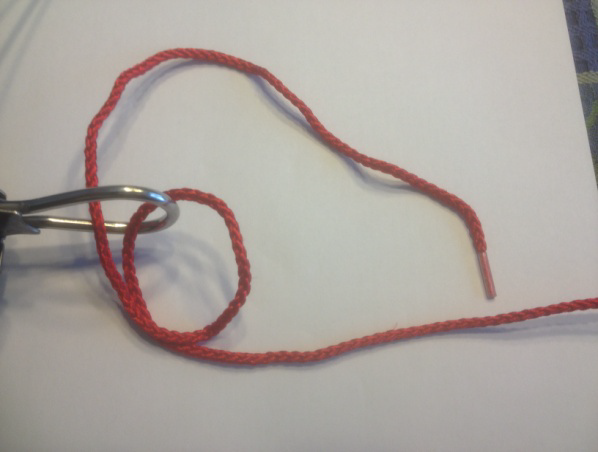
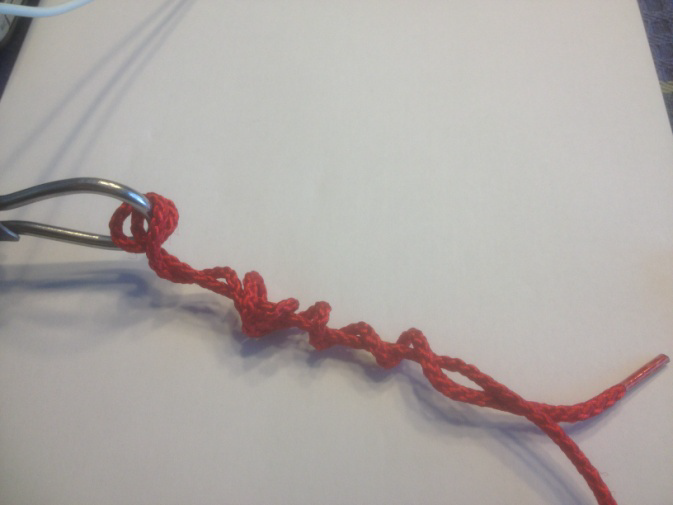
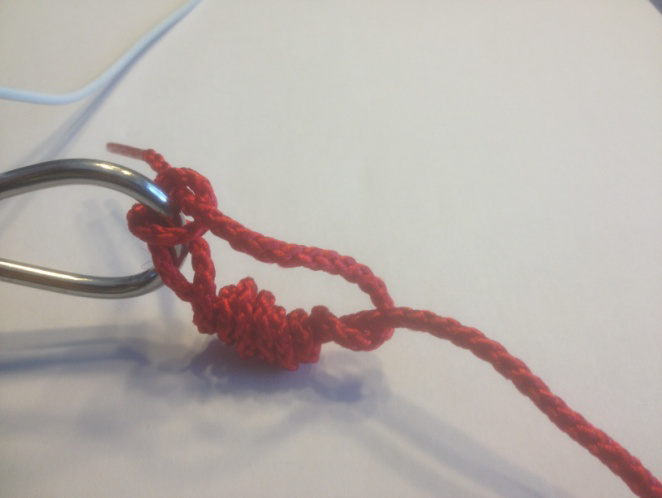
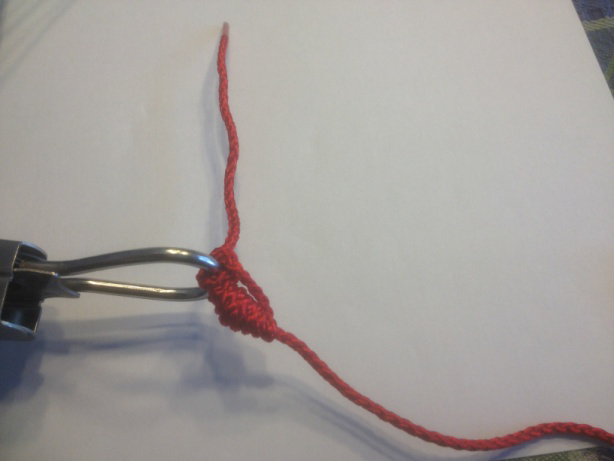
Although you will learn a lot of different knots to use in fishing in the Pioneer Knots Lesson 3, here is one common fishing know for you to learn now. It is called the “Trilene Knot”. We are using a much larger string to demonstrate the knot, just because it would be hard to see a picture of fishing line.
Start by pushing the working end of the fishing line through the eye of the hook twice.
Then wrap the working end of the line around the standing part of the line 5 or 6 times.
Then thread the end through the loop in the line next to the eye of the hook.
Lubricate and pull the knot tight. Trim the end, but not too short.
Sinkers
Sinkers are metal objects that you add to the line to weight the line down so the bait is held around a particular level under the water.

Slit-shot sinkers, like in the picture above, are added to your line by placing the line in the open side with the two little flanges and then squeezing the flanges together trapping the line in the sinker. Use a pliers to squeeze the flanges together. Sinkers come in many sizes and styles. We will concentrate on the split-shot sinkers.
The Technique of Fishing:
You noticed I never went over baiting a hook. I do not start or teaching with a baited hook. What I use is the following set up: Attach the smallest sinker at the end of the line, attach a medium sinker at 6” and then the bobber at 12”. Having no hook on the line means there is less of a chance that you will hurt someone when you are learning to cast.
Casting: (Closed bail Spin Casting Reel)

Learning how to cast takes some practice, but is really a pretty simple
process. I start everyone out casting in their yard with the sinker bobber
setup mentioned earlier. You will need to get a feel for the equipment by
holding the rod straight out in front of you to get a feel for how the
spin-cast reel works. Reel up the line until the bobber is about four inches from
the tip of the rod. Now, press down firmly on the release button and hold it
there.
Notice how the bobber stays in the same place.
Now let the release button go. The bobber should fall to the ground. You have just learned how to release the line from the reel, a very important step in casting.
To prevent loops that can become tangles from forming in the line, carefully add tension to the line with your thumb and forefinger while reeling in the line. Keep just a little tension on the line and do not reel the line in fast or the line will cut you. You should hear a click when you start to reel-that is the pick-up pin of the reel being activated.
Now you are all set to wind line back onto the spool of the reel. Remember whenever you are fishing to always reel in enough line after you cast to hear that click. This will prevent excess line from coming out of the reel, and loose line can mean a missed fish.
Final Check
Your line is ready and your sinkers and bobber are tied on.
Place your bobber 6-12″ from your rod tip and make sure your line is not wrapped around your rod.
SAFETY: Before you cast, look behind you to be sure no one else is there. NOTICE: Check for trees and bushes that can get in your way.
Casting
Face the target area with your body turned at a slight angle, about a quarter turn. Aim the rod tip toward the target, about level with your eyes.
Press and hold down the reel’s release button.
Swiftly and smoothly, bend your arm at the elbow, raising your hand with the rod until it almost reaches eye level.
When the rod is almost straight up and down, it will be bent back by the weight of the bobber and sinkers.
As the rod bends, move your forearm forward with a slight wrist movement.

Next, gently sweep the rod
forward, causing the rod to bend with the motion.
As the rod moves in front of you, as the rod reaches eye level, release your thumb from the button.

The bend in the rod casts the bobber and sinkers out.
You have just made a cast!
If the bobber and sinkers landed close in front of you, you released the thumb button too late.
If the bobber and sinkers went more or less straight up, you released the thumb button too soon.
Casting (The Open Face Spinning Reel)
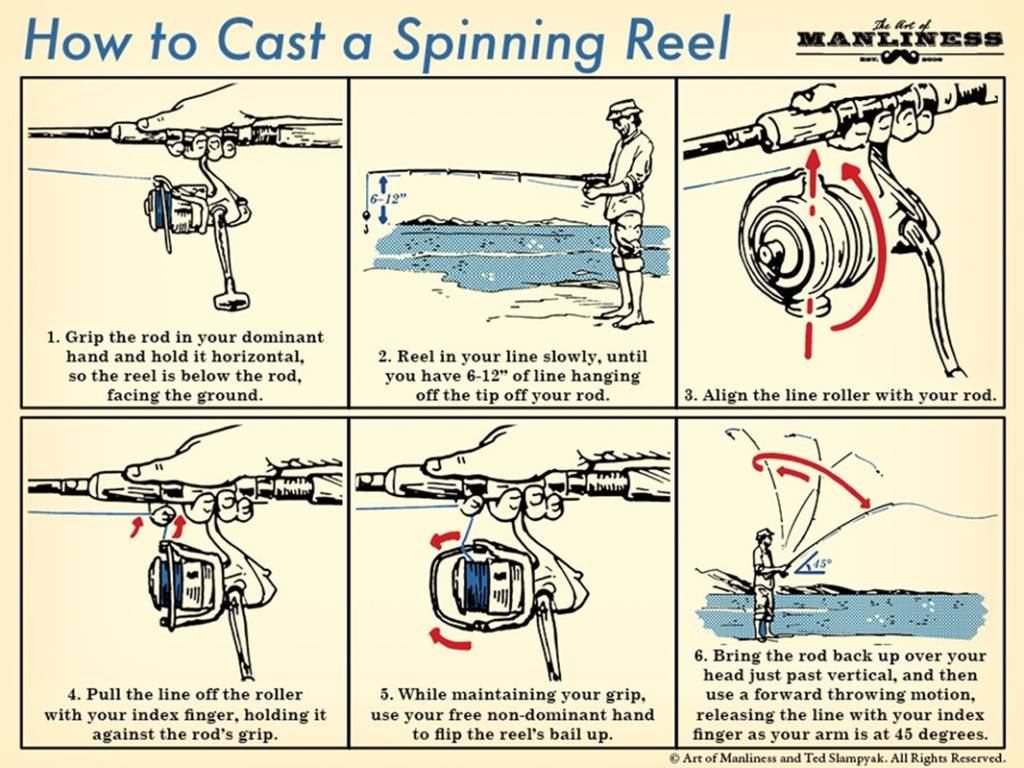
The best way to hold a spinning reel for casting is to slide your rod hand around the reel seat, with two fingers in front of the reel stem and two fingers behind it. This gives you a good casting grip and more importantly, leaves your forefinger free to trap the line as the casting swing is made.
A suitable amount of line is allowed to hang from the rod tip (between 6 and 12 inches). The first finger of the reel hand is extended down toward the spool to pick up the line ahead of the bail arm and the line is then pulled back up against the rod grip, where the finger traps it. The bail arm is opened with your other hand and the reel is now ready for casting. It’s important to get this sequence right. If you open the bail arm before you trap the line, line will spill from the spool and you will make a mess.
With the line trapped and the bail open, swing the rod back past your shoulder and then forward again in a swift, smooth arc. This forward casting stroke should start slow, accelerate, then finish by drifting forward so the rod points horizontally in front of you.
At the appropriate moment (while
rod is still moving forward) the finger holding the line is straightened, and
the casting weight is thrown forward, pulling the line behind it. You need to
get this release timed right, if you release too early in the swing, the weight
will fly up into the air and land who knows where maybe knocking some sense
into you! If you release the line too late in the swing, the weight lands on
the ground or water by your feet. I find this as a humbling experience.
A useful way to get the timing of this release right, is to swing the rod forward and as your casting arms begins to extend, point the line holding finger straight at your casting target. Most times, this will release the line at the correct moment and also direct the cast where it should go.

Now it is time to see about finding some equipment and going out and practicing. As a rule of thumb I practice cast about 5 to 10 casts before I start seriously fishing each and every time I go out to fish. I either practice cast in a grassy area or in the water somewhere I would not normally fish. Practice casting lets you know that the equipment is all working and helps you get the feel of the equipment once again before you start fishing. The worst thing to have happen is getting out in a boat and having your equipment not work correctly and thus ruining a good fishing trip.
Fishing Level 1 Requirements:
1 – Be able to secure a bobber to a fishing line.
2 – be able to secure sinkers to a fishing line.
3 – Be able to cast a practice setup effectively on land or on the water.