Geocaching for Beginners
Ever feel like going on a real life treasure hunt? Then you should get into the fascinating world of geocaching, an exciting activity that is part treasure hunt, part brain teaser, and all-around eliminator of boredom. In a nutshell, geocaching is a GPS tracking game, where you use your GPS-enabled mobile device to locate hidden “geocaches” around the globe — there are 1,565,854 of them worldwide as of 2011 (even in Antarctica!) as reported by Geocaching.com, the main resource for this activity. Geocaching has been around for years. It can become an obsessive hobby.
The Hunt Is On
So how do you get into geocaching? First, get a GPS-enabled mobile device; chances are you already have one if you have a smart phone. Then, download the “Geocaching Intro” app. (If you don’t have an app capable GPS device, you can still go on geocache hunts by looking up GPS coordinates and descriptions on the Geocaching.com website.) The free introductory app has limited functionality, but it’s enough to walk you through a geocache challenge if you want to get your feet wet into this hobby before fully diving in.
The introductory app will find you the three nearest geocaches based on your current location — may it be in the city or out in the wilderness — and show you their ratings on difficulty and terrain. A target will show up on a map with a line between it and your current location. The closer you physically get to the target destination, the shorter the line. Once you arrive to the vicinity of the hidden geocache, you’ll have to use a hint to figure out where the stash is actually hidden. Geocaches can be tucked away anywhere: behind dumpsters, within hollow parts of trees, or within stone walls — wherever one of the hundreds of voluntary geocache mission creators has decided to put it.
In some geocaching challenges,
you’ll arrive at a target destination and then have to solve a puzzle or brain
teaser (of varied difficulty) from the app based on what you see there, in
order to figure out the exact location of the geocache — or the clue to the
next location you have to travel to. When you finally find the secret stash,
there’s a great feeling of satisfaction — like you’ve found a treasure as a
high-tech-enabled Indiana Jones — and then you add your experience to the
mission log via the app, with the subject heading, “Found It!” There is one
draw back and that is that the Geocaching app drains the battery faster than
normal because it is displaying consistent GPS information.
What’s In A Geocache?
Geocaches can be anything, from a small film canister to an official shoebox-sized plastic Geocaching.com box. Inside there’s a log to write your user name and arrival date in; depending upon the size of the geocache, it may be a small notebook or a tiny scroll, so make sure you bring a pen with you. In the bigger containers there may be souvenir items to take with you, or “trackables” — items that are meant to travel from secret location to secret location to reach a particular goal — providing a whole new level of the geocaching game experience if you chose to pick one up.
What do you need to start Geocaching?
- A GPS receiver or GPS-enabled smartphone. GPS receivers can be bought for about $100 these days (probably even less used). Garmin and TomTom are the most popular brand of GPS receivers. Low-end ones are monochrome with limited functionality; high-end ones are in full-color with added features such as 3-D maps and the ability to store your entire trip.
If you have an iPhone or Android smartphone, you can just download Groundspeak’s (the company behind geocaching.com) app. It’s $10 via either the iPhone App Store or the Android Market, and actually does away with several of the Web-based steps below, in addition to providing GPS receiving functionality.
- A pen or pencil. So you can leave a note in the cache to the cache owner.
- A small trinket. There’s a tradition among some geocaches to take a trinket out, and put a new one in. That way, the geocache has some “life” and changes continually over time. You also get something from a stranger, and give something to another stranger.
That’s it! Yes, for a beginning geocacher, that’s really all you need. And the 2nd & 3rd items above are often optional (many geocaches have their own pen, and others are too small for trinkets)
How do I go after my first Cache?
Step 1 – Find nearby caches
This part is easy. Go to Geocaching.com and in the upper-right corner, put in your ZIP code (if you’re in the US), or select your country.
You will see a list of available geocaches nearby with:
- How close it is to you (by ZIP code)
- The type of cache – traditional, multiple (one cache gives you a clue to another), virtual or mystery caches (no actual cache – just a destination with something interesting about it)
- A rating of the difficulty and terrain (go for 1/1 for the easiest!)
- The date placed
- A short description plus a link for more information
- When it was last found by someone. This is always cool because some were just found and logged a few hours or days ago; others have been dormant for months.
Pick a cache and click on the link to get some more information you’ll need.

This page will give you all the information you’ll need to have to find your cache.
Step 2 – Select a cache
Find a cache that’s as close as you’d like (or willing to walk, bike or drive to), with the level of difficulty you’re looking for, and click on the link for more information. You’ll find several things on this page (register for Geocaching for free first, they don’t spam you and don’t make you pay for the basic services).
- The cache’s coordinates (you’ll need this string of numbers to enter into your GPS receiver)
- A description of the area and cache made by the person who left it there; some people are proud of the area and give plenty of rich information, others leave just the basics
- (usually) An encrypted clue, that you can easily decipher near the cache location if you’re really stuck and can’t find it
- Even a map if you’d like a street corner to hone in on; I usually try to ignore this, because part of the fun is following the GPS receiver’s directions and seeing yourself approach the target
- A log of previous geocachers’ notes after finding the cache. It is usually full of spoilers, so don’t look at this section until you’ve found the cache and want to report something to the community.
You can either print out the entire page, or scribble down what you need to know on a piece of paper and take that with you.
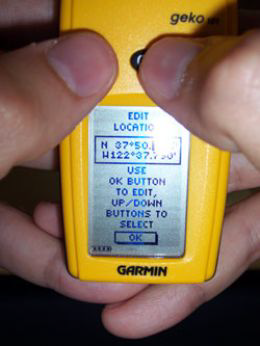
Enter the coordinates carefully!
3. Enter the coordinates into your GPS receiver
Follow the instructions of your GPS receiver to enter a new waypoint (a specific location with coordinates) with the cache’s coordinates. Believe it or not, those coordinates are specific enough to typically get you within 10 feet of the cache! Double check the numbers to be 100% sure they’re right–you don’t want to be searching for a cache miles away from where you should!
Note that the default coordinate type, both for the Geocaching site and most GPS receivers, is WGS84 Datum degrees & minutes (MinDec). The format will look like:
N 37° 45.800
W 122° 10.500
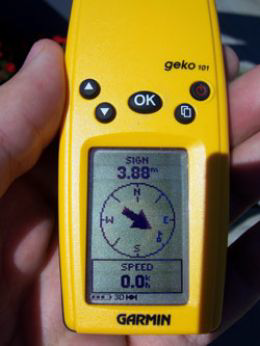
Speed is 0.0 because I stopped to take this picture. But you can see I need to head SE, and walk another 4 m or so.
4. Start moving towards the destination
In your GPS receiver, choose this new waypoint you’ve entered, and GOTO. Then, go outside, away from tall buildings, and wait for your receiver to get strong signals from the GPS satellites circling the earth. This can take anywhere from a minute to five minutes. You will typically not be able to get a signal inside buildings or between skyscrapers.
Once you’ve gotten strong signals and hit GOTO, the GPS receiver will tell you which direction to start heading and how far away your target is. Start walking! (or driving, depending on how far you are) The GPS receiver is remarkably good at telling you where you’re supposed to go, and even how fast you’re going.
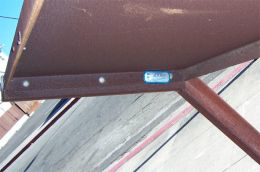
A
cache surreptitiously hidden behind a metal sign, using a magnet.
5. Use clues & your eyes to find the cache
When you get within 10-20 feet of the cache, the GPS’s resolution will not be good enough to help you any further. It just puts you in a 20 foot circle of where you need to look. Now you need to use the clues and your intuition to find the cache.
Look for clues:
- In the name of the cache
- In the description that’s on the page
- (if you’re really, really stuck) Decypher the encrypted clue, but keep in mind this often explicitly tells you where to look, eliminating the fun out of the search
Places to look:
- The underside or back of metal fixtures
and signs; often, the cache is magnetically stuck out of view from casual passersby
- In the brush or plant cover, often behind or under a retaining wall
- Sometimes covered with rocks or bark
Keep in mind that the cache might be above you or below you.
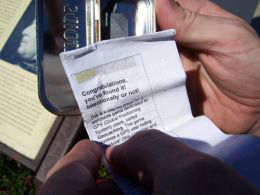
This little stapled log has room for thousands of short entries. Be sure to leave yours!
6. Open up the cache!
Open up the cache carefully, and take a look inside!
There should be a list or pad of paper, which has some general instructions to people unfamiliar with geocaching, or for people who might have found it by accident. There will be a list of people who found them before you. You can leave a short entry in the (paper) log, along the lines of:
8/27/07 {username} TFTC! (Thanks for the Cache)
There might be some other small trinkets. If you’ve brought one of your own, you can leave it inside, and take another one as a memento of your cache.
You should go back to the Geocaching site later, and leave feedback to the cache owner in the (Web) cache log, who typically checks it often.
What is a Trackable?
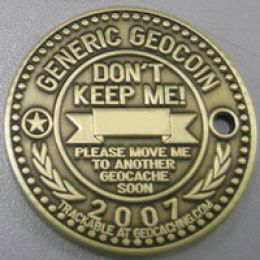
Not designed to be kept, geocoins should hop from geocache to geocache.
Geocoins – Track your own coin’s movement
Geocoins are custom-made coins that you can leave in caches that you find. The idea is that your coin will travel from cache to cache over time, as people who find the cache take it out and put it in their next cache. Then they log where the coin has been left, allowing you to track where your coin has gone.
Say you left your own geocoin, with its own serial number, in a cache in Tempe, Arizona. Then, someone finds that same cache a week later, and takes it out. He then puts it in the next cache he finds in El Paso, Texas. If he plays by the “geocoin rules”, then he’ll go to the geocoin Website, look up the coin by its serial number, and register that it is now in a cache in El Paso. You, then, could do a search on your serial number, and see that the coin you left in Tempe has now transported itself across a couple of state lines to the east, in Texas! There are several companies that sell geocoins. The concept is very similar to Where’s George, which tracks dollar bills as they change hands through normal cash transactions.