You have been introduced to the GPS receiver in the prior level and now it is time to go into more detail about the device. Some receivers vary but most receivers have the following functions and features in them. They may be called by slightly different names so consult your user’s manual for the specific details as it relates to your specific GPS receiver.
The 4 Basic Functions
These are common to virtually any GPS receiver intended for hiking:
- Give a location: A GPS unit accurately triangulates your position by receiving data transmissions from multiple orbiting satellites. Your location is given in coordinates: latitude and longitude or Universal Transverse Mercators (UTMs).
- Point-to-point navigation: A location or destination is called a “waypoint.” For example, you can establish a starting waypoint at a trailhead by using the location function. If you have the coordinates for the campsite you’re headed for (taken from a map, resource book, website, mapping software program or other source), a GPS can give you a straight-line, point-to-point bearing and distance to your destination. Since trails rarely follow a straight line, the GPS’ bearing will change as you go. The indicated distance to travel will also decrease as you approach your goal.
- “Route” navigation: By combining multiple waypoints on a trail, you can move point-to- point with intermediate bearing and distance guides. Once you reach the first predetermined waypoint, the GPS receiver can automatically point you to the next one or you can manually do this.
- Keep a “track:” One of the most useful functions of a GPS unit is its ability to lay a virtual “breadcrumb trail” of where you’ve been, called a track. This differs from a “route,” which details where you’re going. You can configure a GPS to automatically drop “trackpoints” over intervals of either time or distance. To retrace your steps, simply follow the GPS bearings back through the sequence of trackpoints.
Key Concepts
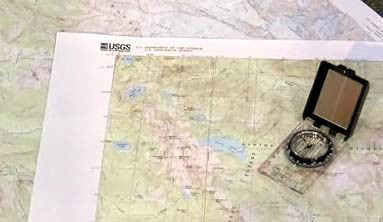
A GPS receiver does NOT replace a map and compass or the knowledge of how to use them. Your GPS unit DOES augment and enhance your navigational abilities with technology. But you should still always carry a detailed map of the area and a compass.
A
GPS unit is only as good as the map you use with it. The most-useful
topographical maps available in the U.S. are the 1:24,000-scale maps published
by the U.S. Geological Survey.
Practice! Before using your GPS receiver as a primary navigational tool in unfamiliar territory, set yourself up for a successful, enjoyable trip. Familiarize yourself with all of the unit’s features and controls. Read the owner’s manual. And practice in your neighborhood or in a local park until you’re comfortable with how everything works.
Basic Skills
Acquiring Satellites
To provide reliable navigational information, including your position, a GPS receiver needs to receive good signals from at least 4 satellites. To “acquire” satellites, turn on your GPS and go to the Satellite screen:
- This will display the current configuration of the satellites and the strength of the signals. It may take several minutes for the GPS unit to lock in to the satellites, so be patient.
- If you see only a few satellites and weak signals, then don’t rely on the GPS’ directions. Use your map and compass.
- A clear view of the sky is best for an optimal satellite lock. Tree canopy, canyons and tall buildings that obscure the view overhead or of the horizon can impede reception.
- You may acquire satellites faster if you turn the unit off, then power back on.
- · Be sure the batteries are fully charged.
Reading Coordinates
To simplify map navigation, a system of coordinates is used. Coordinates divide the map into a grid and identify a particular location by listing its relative position north/south and east/west. To choose a coordinate system, simply go to the Preferences screen. The most common coordinate systems used in GPS navigation are:
- DMS (Degrees/Minutes/Seconds): This is the standard way of listing latitude and longitude:
Example: N47° 37′ 12″ W122° 19′ 45″.
In this example, N47° 37′ 12″ indicates that the north/south position is 47 degrees, 37 minutes and 12 seconds north of the equator; while W122° 19′ 45″ places the east/west position at 122 degrees, 19 minutes and 45 seconds west of the Prime Meridian (at Greenwich, England).
- DDM (Degree Decimal Minutes): A decimal version of DMS, DDM is used by geocachers and other GPS enthusiasts. These coordinates look like this:
Example: N47° 37.216′ W122° 19.75′.
The north/south and east/west
position remains unchanged. The difference is that the seconds part of the
location is converted to a decimal by dividing the seconds by 60.
- UTM (Universal Transverse Mercator): This military-derived grid system is not tied to latitude and longitude. It divides the map into a square grid with the grid lines all 1,000 meters apart. Most topo maps have UTM grid lines printed on them. The system is metric-based and requires no conversion of minutes and seconds.
Example: 10T 0550368 5274319.
Here, “10T” identifies the map zone, “0550368” is the east/west or “easting” number, while “5274319” is the north/south or “northing” number.
Your GPS receiver can
automatically display whichever of these coordinate systems you select. It can
also convert coordinates from one system to another. This is helpful if you’re
given coordinates for a location in one system (e.g., UTM), but want to
actually navigate in another (e.g., DDM).
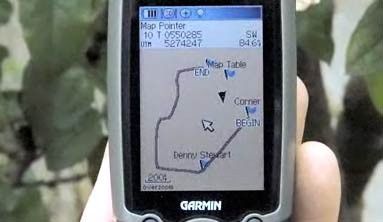
Entering Waypoints
Navigation
Skills
Plotting a route with waypoints is easy. Simply press the MARK button (or, on some units, press and hold the ENTER button). If you’re marking a waypoint where you stand, you can often do this with the single press of a button. You can also add multiple levels of detail: a name (e.g.,”trailhead” or “waterfall”), the coordinates, the elevation and even a short note. This is particularly helpful if you’re marking waypoints for the trail ahead, perhaps before you leave home.
Tip: Whenever starting a hike, add a waypoint where you’ve parked your car.
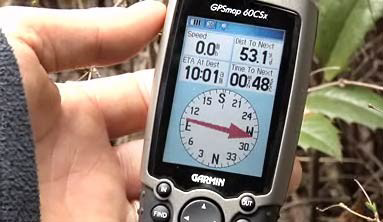
Following Waypoints
With waypoints in place, your GPS receiver can guide you from point to point. Use the FIND or GOTO button to identify a particular waypoint target. Then switch to the Compass screen where the GPS receiver will give you a bearing and estimate the distance and time of travel.
Keeping a Track
If you take a spontaneous side trip from base camp or in any way venture into unknown territory, one of your GPS receiver’s most useful features, “tracking,” comes into play. When you enable the TRACK RECORDING feature, the GPS unit will automatically set trackpoints as you go, essentially laying a breadcrumb trail to show where you’ve been.
You can adjust trackpoints to be
laid at specified intervals of time or distance. The shorter the distance
between trackpoints, the more accurate the path back. For example, trackpoints
set every 100 yards allow a greater risk of you wandering off course versus
trackpoints set every 10 feet. The intervals you select should depend on the
presence of a marked trail, the terrain, the
weather and other conditions that you find. In addition to this essential guiding feature, tracking also allows you to record time and distance traveled.
Making the Most of Your GPS
Sensors
This term refers to your unit’s barometric altimeter and magnetic compass.
- Barometric altimeter: All GPS units provide elevation as part of the information gleaned from the satellites. But the advantage of also having a barometric altimeter is that it operates independently of this signal. So if the satellite signal becomes too weak to be reliable, the barometric altimeter can still give you an accurate elevation. And since it measures air pressure, it gives you an idea of approaching weather changes by displaying a chart of barometric trends.
- Magnetic compass: The magnetic compass works in a similar manner to a traditional capsule compass. Since you’re still carrying the latter compass (and a hard-copy map), the magnetic compass is somewhat redundant. So if you need to conserve the GPS battery life, you could turn off the magnetic compass and just use your capsule compass. This will not affect the navigational functions of the GPS receiver, which rely on satellite signals.
Memory Cards
In addition to having preloaded maps, many GPS units allow you to download more maps using CD-ROM software (available separately). Some GPS receivers give you even greater flexibility by using removable microSD memory cards. These cards are available preloaded, or you can download maps from your computer to a blank card. If your GPS unit uses memory cards, it’s easy to organize your maps for maximum efficiency and ease. For example, you could have one memory card for topographical maps, one for streets and roads, and another for marine charts.
Reception Tips
One of the more common complaints from folks who have just purchased their first GPS receiver is that they’re having difficulty establishing a good, clear signal. If you experience this, refer to your owner’s manual or consider the following:
Satellite lock: Do this in the parking lot before you head into the trees where reception is more problematic and variable.
GPS placement: Fix your receiver to a shoulder strap of your pack to give it a clear view of the sky. If you walk with the GPS unit in your hand, don’t swing your arms. This motion can disorient the receiver.
Avoid obstacles: A GPS
receiver’s accuracy (and usefulness) is completely dependent on being able to
receive clear transmission signals from four or more satellites. If the
“view” to the horizon or overhead is obstructed, that reception can
be effectively blocked or diminished,
making the GPS unit unreliable. If this occurs, you may need to get to higher, open ground. In the meantime, turn off your GPS to conserve battery power. (If your unit has an advanced chipset such as the SiRF Star III, reception and signal strength will be greatly enhanced in almost all conditions.)
Initializing: Do this simple process if your new GPS receiver is not picking up signals very well, even with open access to the sky. Consider that most GPS receivers are manufactured in Asia. So when you power it on the first time, its most recent “memory” of satellite links is from Asia.
Initialization orients the GPS receiver to its current surroundings and downloads information from the satellites in the local sky. This, in turn, helps it to acquire satellites more quickly and effectively in the future.
Check your owner’s manual for instructions on how to initialize your unit.
Batteries: Make sure they’re fresh at the start of your trip. And carry spares. Consider turning off nonessential features such as auto-routing and backlighting to conserve battery life.
Tip: Lithium batteries are the best choice for GPS receivers due to their long life. However, when brand-new, these batteries have a brief power spike that adds unwanted horizontal lines across some GPS screens. To solve this, simply use the lithium batteries on another electronic device for a few minutes, then insert them into your GPS unit.
Don’t rely on GPS alone for navigation. Always carry a map and compass.
This shows how UTM coordinates are displayed.

You can identify trail landmarks as waypoints
The compass screen offers a wealth of useful information.
This feature displays your elevation and helps forecast weather.
Planning a Trip
Things You’ll Need
- Extra battery
- Compass
- Trail map
Instructions
- – Play around with the digital compass feature on your GPS receiver before hiking unfamiliar terrain. Point the receiver at different directions, angles and elevations to test out the device’s limitations.
- – Download maps for national parks, state trails and other hiking environments to your GPS receiver before leaving your house. Most GPS manufacturers offer CD or PC downloads to receivers with updated maps to reflect construction, new hazards and trail changes.
- – Lay out a general path for your hiking trip when you use the quickest routes features on your GPS receiver. This tool allows you to connect your starting point to various spots along a hiking trail that are recognized by your GPS software .
- – Record the distance of your hike while tracking calories lost during your trip using your GPS receiver. Many GPS receivers feature digital pedometer and exercise tools that allow you to assess the physical benefits of hiking.
- – Switch between overhead and ground-level views of your GPS map to find the best option for hiking. An ideal GPS receiver for hiking will have multiple points of view available to help avoid obstacles further along the trail.
- – Flip through updated forecasts, barometric pressure readings and humidity levels as you use your GPS receiver. Pay particular attention to air pressure during your trip to determine the likelihood of a serious storm.
- – Plan your hiking trip based on the sunrise and sunset times indicated on your GPS receiver. These times are updated on your receiver with frequent
Tips & Warnings
- Protect your GPS receiver while hiking with a rubber case and nylon mount. A rubber case surrounding the GPS receiver will protect this delicate device when dropped or placed in a backpack. Most GPS receivers designed for hiking are packaged with nylon mounts that fit around your arm for easy use.
- Leave yourself a safety net by packing a traditional compass and trail map in your bag. A GPS receiver may run out of power or break during the middle of your expedition. Map out your path along a particular trail before leaving to make emergency navigation easier.