Webster’s New World Dictionary states that a ‘knot’ is, “A lump or knob in a thread, cord, etc., formed by passing one free end through a loop and drawing it tight or by a tangle drawn tight.”
In our Lord’s day, a number of His disciples were fishermen. The nets that they used were made from ropes tied together with knots, just like we are tied together as Christians having faith in the Word of Jesus Christ.
Luke 5:1-1 One day as Jesus was standing by the Lake of Gennesaret, the people were crowding around him and listening to the word of God. He saw at the water’s edge two boats, left there by the fishermen, who were washing their nets. He got into one of the boats, the one belonging to Simon, and asked him to put out a little from shore. Then he sat down and taught the people from the boat.
When he had finished speaking, he said to Simon, “Put out into deep water, and let down the nets for a catch.” Simon answered, “Master, we’ve worked hard all night and haven’t caught anything. But because you say so, I will let down the nets.”
When they had done so, they caught such a large number of fish that their nets began to break. So they signaled their partners in the other boat to come and help them, and they came and filled both boats so full that they began to sink.
When Simon Peter saw this, he fell at Jesus’ knees and said, “Go away from me, Lord; I am a sinful man!” For he and all his companions were astonished at the catch of fish they had taken, and so were James and John, the sons of Zebedee, Simon’s partners. Then Jesus said to Simon, “Don’t be afraid; from now on you will fish for people.” So they pulled their boats up on shore, left everything and followed him.
Why should you learn to tie knots?
Most of us already know how to tie a simple knot. We learned how to tie our shoes at a very early age. You may need to tie ribbons on gifts and may even tie things together for storage or for transportation. In camping situations knots are used often, and if you are a fisherman knots are used almost every time you need to tie a new lure or hook to your line. So, knowing how to tie knots is not new, but the type of knots you may need to tie are different in many situations, and you will need to learn which knot is best used for each situation. Everyone one should know how to tie several types of knots!
Knot making is a simple mechanical skill, a skill that you will never forget, but it takes practice, and repetition so the skills become natural and you remember how to tie the knot.
NAMES OF THE PARTS OF A ROPE
This writer understands that knowing the names of the different parts of a rope does not indicate how well a Lutheran Pioneer can tie a knot, but this chapter on knots begins with the names of the different parts of a rope for two reasons:
Knowing the names of the different parts of a rope does not indicate how well a Lutheran Pioneer can tie a knot, but this chapter on knots begins with the names of the different parts of a rope for two reasons:
- So you can follow the instructions explaining how to tie the different knots.
- For the Pioneer who has developed an interest in knot tying and wants to learn more on the subject.
The ‘working end‘ is the name given to that part of the rope on which the knot is tied. In addition to the working end, the following names are also used. It is also called the running end, the loose end, the bitter end, the free end or just simply referred to as the “end”.
The ‘standing part‘ is the next name to know. It is the name given to the rest of the rope – not to include the working end. This “rest of the rope” has also been described as the “left over” or “unused section” (It should be noted that there is no such name as “standing end”).
‘Bight‘ is the name given to the U shape of the rope; the sides of the bight may be long or short.
‘Loop‘ is the name given to a bight after the sides have crossed. There are two kinds of loops:
Overhand Loop
Underhand Loop
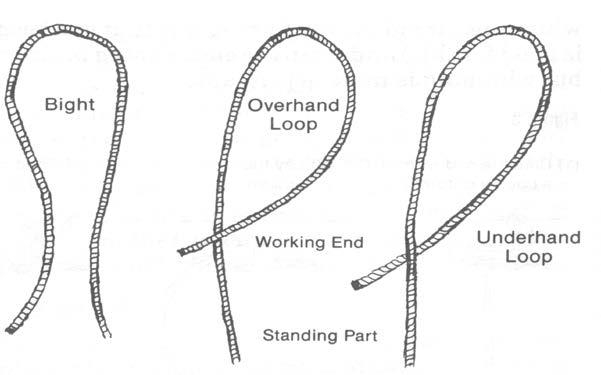
An overhand loop is made when the working of the bight crosses over the standing part. An under loop is made when the standing part crosses over the working end.
Two more names that are interesting to know are the bend and the hitch.
‘Bend‘ is the name given to the knots used to fasten two ropes together, example: Sheet Bend.
‘Hitch‘ is the name given to a knot used to fasten a rope to a timber, pipe or post, example: Half Hitch.
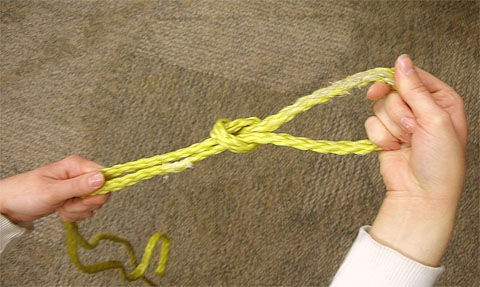
SQUARE KNOT
The Square Knot is also known as the Sailor’s Knot, Flat Knot and Reef Knot. In the days when ships depended upon the wind blowing on their sails to move them, a captain may decide that he wants less sail exposed to the wind. The sailors would then climb to the yardarm and begin to roll or fold a portion of the sail. To secure the rolled part, a sailor would tie it with a piece of rope. The rolled or folded portion of the sail is called a reef. The knot on the rope, used to secure the reef, is called a Reef Knot. That Reef Knot is our present day Square Knot. Now you know the origin of the Square Knot. More up-to-date, the Square Knot is called a Flat Knot because it flattens as it is tightened. It is the knot used in first aid to tie bandages and it has also been used to tie packages.
The Square Knot is a well known knot and has been in use for a long time. This knot does have some problems however. The following is a list of what one should avoid when using this knot. Also included are knots that would do a better job of joining two ropes.
A Square Knot is secure under a strain, but it does free up very easily.
If the ropes become relaxed, the knot may loosen. The Square Knot, under tension, will jam and fall apart if the ropes are not the same size or the pull is not even. It appears that the Square Knot may be used for tying together two ropes of about the same diameter. But if the ropes are not the same size, or if they happen to be wet, the Square Knot will not hold.
The Sheet Bend (later in chapter) is a much better knot to tie when two ropes of different sizes or diameters are used.
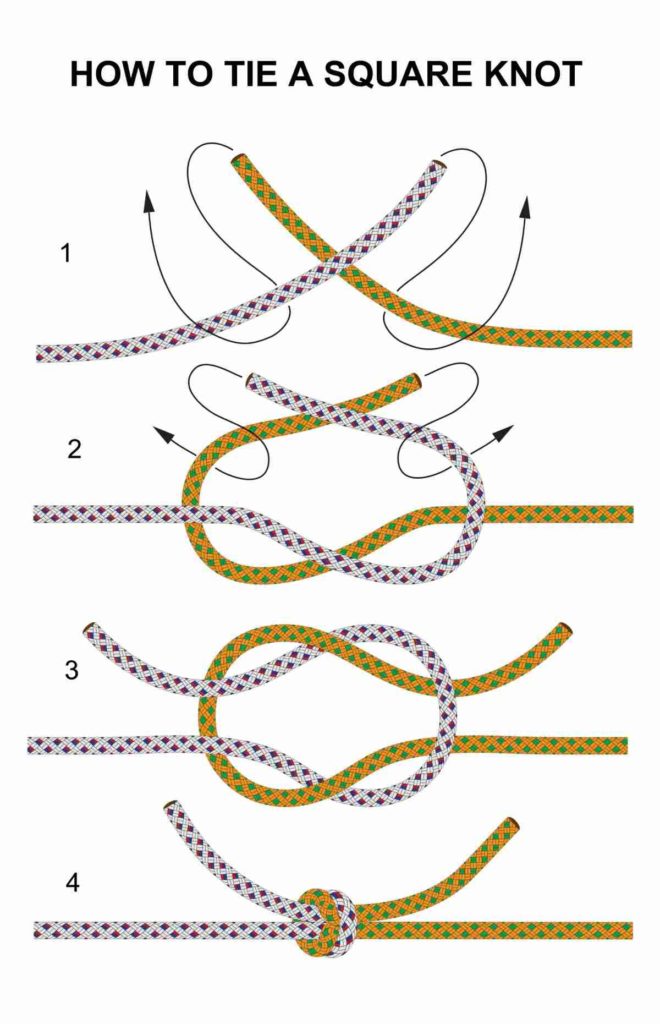
To tie a Square Knot, remember a saying I was taught in first aid class. “Right over left, left over right.” You start with two rope ends (working parts). You cross the right rope end over the top of the left rope end. Take the right end and do a turn around the left end.
Cross the left rope end over the right rope end. Take the left end and do a turn around the right end and you have a Square Knot.
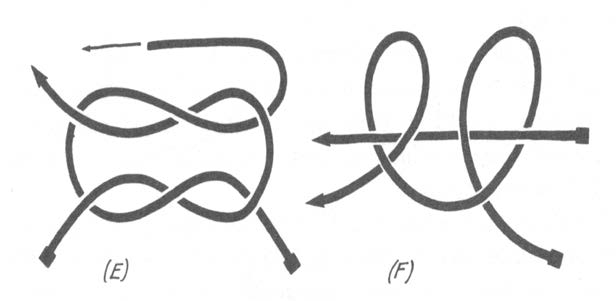
Here’s an easy way to untie the square knot. From one side of the knot, grab the working end with one hand and the standing part with the other hand and pull. It becomes another knot that can be slipped apart (Figure 2).
HALF HITCH/TWO HALF HITCHES
The US Army has taught people how to tie a Half Hitch for years . The Half Hitch was used to erect a pup tent back in basic training. You would secured the tent to the stakes with three Half Hitches spread about two inches apart. The reason for this: In the darkness (with no flashlights), and the cold (meaning that you must wear gloves to untie frozen knots), those Half Hitches tied that way are the easiest knot to untie in those conditions. Plus, the knot will still do an excellent job.
The Half Hitch can be used to tie a rope to a larger rope or to a pole. Just how secure this hitch is going to be is open to question. One author writes that it will hold against a steady pull on the standing part, but the hitch will not be very secure. Another writer notes that a single Half Hitch will probably not hold. Two Half Hitches will probably hold when one will not, but there are two disadvantages:
If put under a heavy strain, they will jam. This jamming will especially happen if the ropes are wet, then the knot may be hard to untie.
This jamming will especially happen if the ropes are wet. Then, the knot may be hard to untie. The Two Half Hitches is basically a fancy slip knot.
Here’s how to tie Two Half Hitches to a pole:
Pass the working end around the pole and over the standing part.
Pass the working end through the eye of this loop and around the standing part to form an underhand loop.
Go around the standing part once again, only this time form and overhand loop.
Check (figure 3) carefully to see how it should look.
CLOVE HITCH
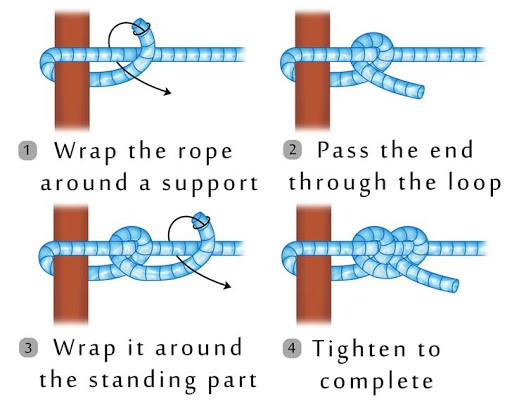
The Clove Hitch is probably one of the most used hitches. The reason for this is the ease at which the hitch is tied to a pipe, timber or a post; and after a severe strain, the Clove Hitch can be easily untied. Another advantage of the Clove Hitch is that it can be tied anywhere along the rope. Because it pulls against itself, the Clove Hitch is a very secure hitch. If it is tied at the end of a rope, the Clove Hitch can be made even more secure by adding two half hitches. Also, if the Clove Hitch is not subject to constant tension, another loop can be put around the hitch, just under the center of it to keep the hitch from loosening up.
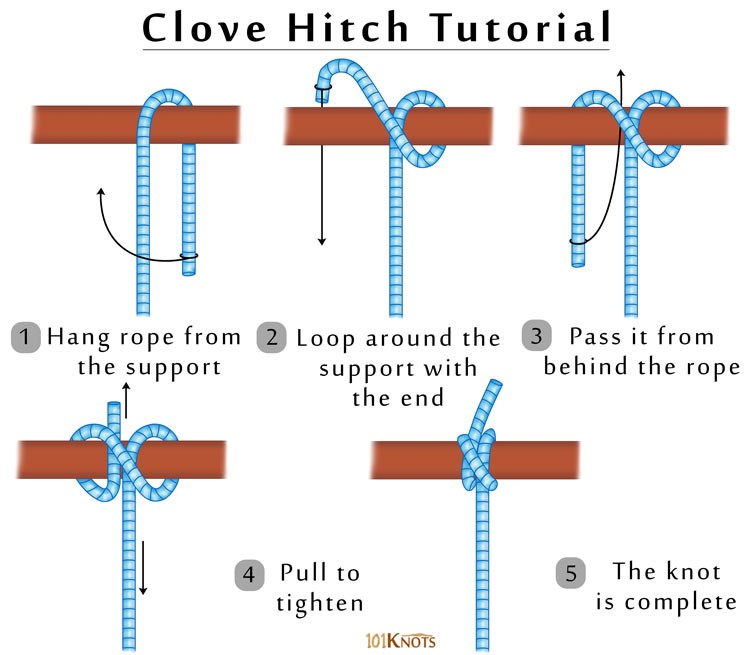
Here are 3 ways to tie a Clove Hitch.
The first way: make an overhand loop, then make a second overhand loop. Place the second loop over the first. Place both loops over a post, then tighten the Clove Hitch (fig. 4).
The second way: start with a turn around the post. Cross the working end over the top of the standing part and go completely around the pole. Take the working end and go under the ‘crossing over’ rope laying it parallel to the standing part. Then, tighten the Clove Hitch (fig.4.)
For the third way: re-read the story of the dock worker again. Just remember to keep both loops overhand.
TIMBER HITCH
The Timber Hitch is used for moving logs, timbers, heavy pipe and beams. These items can be moved with the Timber Hitch either by towing or by hoisting in the air.
To tie the Timber Hitch, start with an overhand loop. Next, you take the working end and make a bight around the standing part. Then you make the bight into a loop (fig. 5) and continue turning the working end around the upper bight several times (fig. 6).
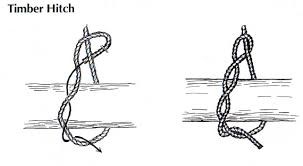

Once tied and you are using the rope to move things, be careful, because the knot could slip and pull loose. Always keep tension on the rope.
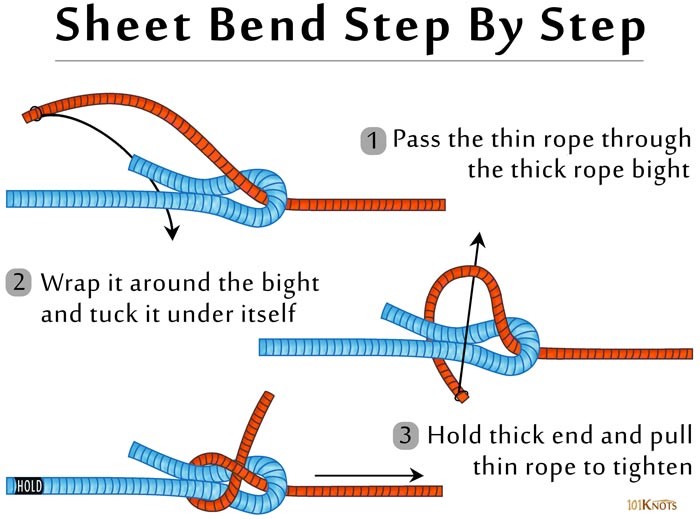
SHEET BEND
The important characteristic of the Sheet Bend is its ability to tie two ropes of different sizes or diameters together and not become untied. This knot will also hold if there is not a continuous strain on it. Lastly, it is considered superior to the square knot for tying two ropes together. This is because if forms a stronger bond and is more easily untied than the square knot. In order for the Sheet Bend to stay dependable, it must be tied so the working ends are on the same side of the knot. It’s a great knot to use when fishing and you may want to use a smaller diameter (or ‘test #’) line as a ‘leader’.
Before instruction on tying the single and double Sheet Bend, you should remember the two following points:
- Always use the rope with the largest diameter to make your starting bight.
- Keep the working ends of both ropes on the same side of the knot.
To tie the Sheet Bend, start with a bight made of the rope with the largest diameter. Next, bring the smaller rope up through the bottom of the bight and bring it toward the working end of the larger rope. (Remember, you must keep the ends of both ropes on the same side of the knot. If you do it wrong, the mistake will be made at this step.) Now bring the working end of the small rope under and around the top of the bight. Finish by putting the working end of the small diameter rope under its standing part (Figure 7).
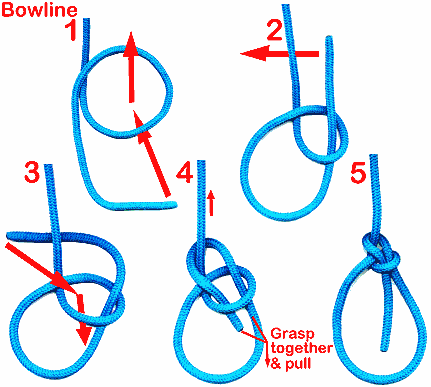
BOWLINE
The Bowline is referred many times as the knot used to rescue people from a deep hole, or a cliff, because the loop would not slip and will not tighten around a person as tension is applied to the knot. But there are many other uses.
First, the Bowline is a strong knot. It will not jam or slip. This ‘not slipping’ means that the loop may be of any length and it will hold. Now, what else can this knot be used for besides rescuing people? Joining two ropes, even if the ropes are of unequal sizes. Also, on the farm, this knot can be used for tying around the neck of an animal to use as a leach to keep the animal from running freely. Some people call it a farmer’s knot, but the other name it has is, “Standing Bowline”.
To tie the Bowline, remember this saying, “the rabbit comes out of his hole, goes around a tree and goes back in his hole”.
Start by forming an overhand loop in the working end. Then, put the working end through the overhand loop starting from the bottom. Here is where you adjust the size of the big loop. Now, put the working end under and around the standing part. Put the working end back through the small loop and snug up the knot. This is a tricky knot to tie. You may have to try it several times until you get the hang of it.
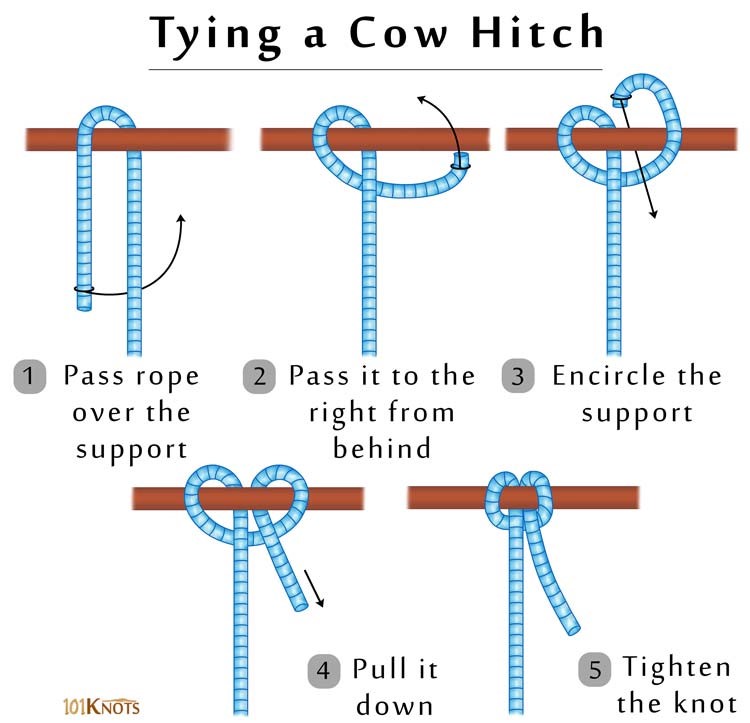
The Cow Hitch
This hitch is really useful for tying a animal to a pole so it can graze round it. This is a little bit different from a clove hitch so be careful when asked to tie it. As the animal pulls on the rope the knot tightens.
Slip Knot
Form a loop in the end of the rope. Prepare a bight in the short end. Tuck the bight through the loop and tighten. The knot can be used as temporary stopper knot. A slip knot is a type of knot that can “slip” along the rope and can easily be untied by pulling one of the ends. This knot is easy to tie and commonly used in rock climbing, knitting, and securing loads on trailers.